
RICOH Always Current Technology Updates
Update your Ricoh multifunction printers (MFPs) by downloading the latest features to help you optimise your document management workflows.
Latest Security updates
1 Login Password Extension for Scan to Folder 1/2
- Support for Cloud File Server Services such as Amazon FSx and Azure Files.
- The login password for folder connections on RICOH products, which was partially limited to 64 bytes, has been extended to 128 bytes.
Limitations
Once this setting is turned ON, the login password will remain at 128 bytes even if the ACT is deactivated.
Login Password Extension for Scan to Folder 2/2
[Address Book]▶[User]▶[Edit]▶[Destinations]▶[Folder]▶[Protocol=SMB]▶[Folder Authentication Info]
①▶[Same as Administrator’s Setting]
=System Settings >Send>Folder>Default User Name/Password>SMB ・・・128byte
②▶[Specify Other Authentication Information]・・・64byte
[Address Book]▶[User]▶[Edit]▶[Destinations]▶[Folder]▶[Protocol=FTP]▶[Folder Authentication Info]
①▶[Same as Administrator’s Setting]
=System Settings >Send>Folder>Default User Name/Password>FTP ・・・64byte
②▶[Specify Other Authentication Information]・・・64byte
2 Expansion of SAN Certificate Support
- Support for SAN (Subject Alternative Name) when creating a CSR (Certificate Signing Request)
- If this is not supported, a warning may be displayed in certain browsers such as Microsoft Edge, Google Chrome and Firefox when creating a CSR.
3 Expansion of Password Policy Feature Support
Policy checks will also be performed when setting a password for PDF transmission via Scan to Mail, enabling operations in accordance with the password policy.
Details
- Complexity Setting
- Level 1: Use at least two types of characters from the four categories listed on the right above.
- Level 2: Use at least three types of characters from the four categories.
- Do not Restrict: No restrictions on type of characters used.
- Minimum Number of Characters (Setting to "0" means there will be no minimum)
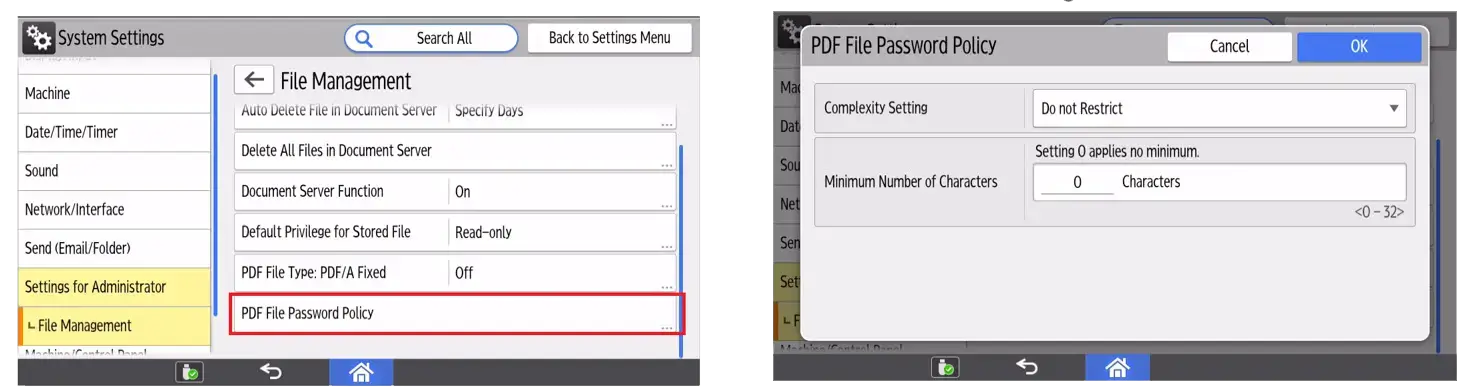
Configuration
[System Settings]▶[System for Administrator] ▶[File Management]▶[PDF File Password Policy]
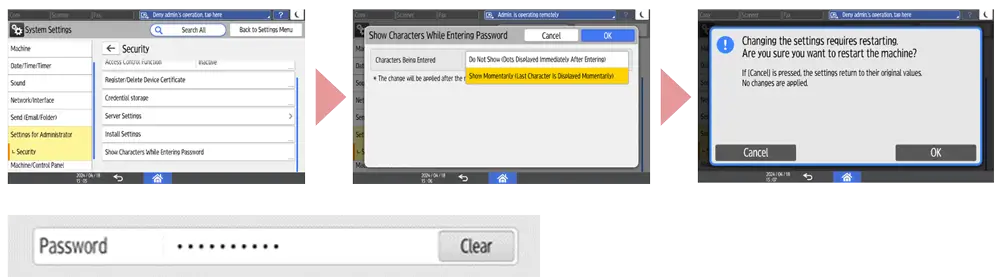
1 Hide characters when typing passwords
Users can choose to hide characters when typing password on the control panel.
This function can be set from the control panel or from the Web Image Monitor.
How to set:
- System Settings] ▶ [System for Administrator] ▶ [Security] ▶ [Show Characters While Entering Password]
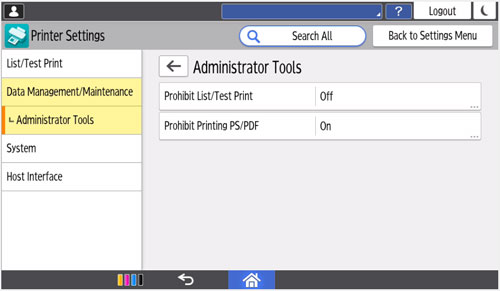
1 Prohibit Printing of PostScript/PDF
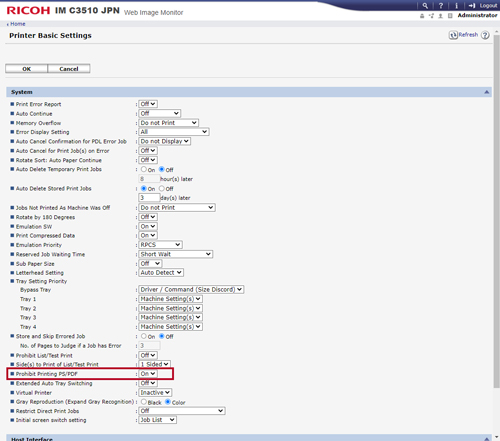
You can now prohibit the machine from printing PostScript and PDF files to prevent PostScript and PDF, which are printer languages that work with scripts. The function complies with NIST 800-171.
You can change the setting either using Smart Operation Panel or using Web Image Monitor.
- Configure this in [Settings] > [Printer Settings] > [Data Management/Maintenance] > [Administrator Tools] > [Prohibit printing PS/PDF] using Smart Operation Panel.
- Configure this in [Device Management] > [Configuration] > [Basic Settings] > [Prohibit printing PS/PDF] using Web Image Monitor.
2 Allowing Guest Users to Use Wireless Direct Printing
Guest users can now use wireless direct printing even if access control is specified. Select [Active] to allow guest users to wireless direct printing when access control is specified.
- Configure this in [Device Management] > [Configuration] > [Security] > [Access Control] using Web Image Monitor.
3 Ability to specify HSTS
You can now specify HSTS. When HSTS is active, Web Image Monitor is always accessed via HTTPS.
- Configure this in [Device Management] > [Configuration] > [Security] > [Network Security] using Web Image Monitor.
How to enable V2.11 security features
In order to enable V2.11 security features, please set [SMBv3 Extended Functions] to [Active] from the Web Image Monitor.Instructions : SMBv3 Extended Functions setting
- Setting in [Device Management] > [Configuration] > [Network] > [SMB] > [SMBv3 Extended Functions] on Web Image Monitor.
- Set [SMBv3 Extended Functions] to [Active] to enable authentication level setting, sending data to a folder in an encrypted server, and transmission via SMBv3.0.2 and SMBv3.1.1.
- In advance, activate [SMBv2/SMBv3] in [SMB].
Instructions : Authentication level setting
- Configure this in [Device Management] > [Configuration] > [Network] > [SMB ] > [Advanced Settings ] > [Authentication Level] using Web Image Monitor.
- When [Level 4: Kerberos Authentication] is selected, you can send scanned data to a computer that belongs to the domain and whose computer name is 15 characters or less.
1 Kerberos Authentication in Scan to Folder
Authentication level for SMB data transmission can be selected on the Web Image Monitor. You can specify Level 4 Kerberos Authentication.
2 SMB encryption by file server
You can use SMB data transmission to an encrypted file server. You can encrypt on per file server basis.
3 SMBv3.1.1 for Windows Authentication
You can use SMB3.1.1 for Windows Authentication and data transmission.
1 End-to-end print encryption
To protect data from malicious attack and ensure end-to-end security, print data can now be encrypted using TLSv1.3.
2 Integrated Windows Authentication in SMTP Authentication
You can use the Integrated Windows Authentication (NTLM) as an authentication method for SMTP server.
1 End-to-end print encryption
To protect data from malicious attack and ensure end-to-end security, print data can now be encrypted using TLSv1.2.
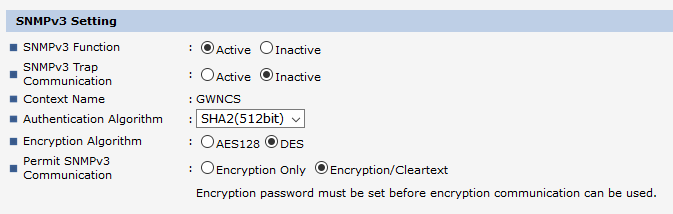
2 SHA2 support on SNMPv3
To meet enhanced government security requirements, SHA2 (224bit/256bit/384bit/512bit) is now available as an authentication algorithm.
3 Secure internet fax connection
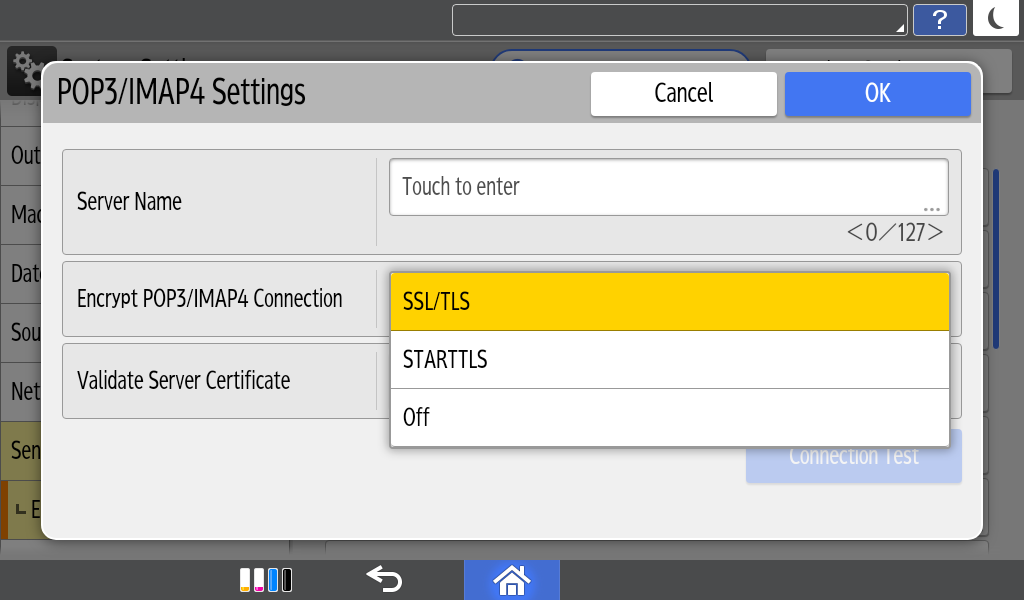
The POP3/IMAP4 encryption has been extended to include SSL/TLS. Customers using internet fax with Office 365 and Gsuite can now apply a secure SSL connection.
4 Batch change security settings
Eliminating the need to change/reinstate security settings manually at multiple individual devices, system administrators can now apply a remote global change to the following settings: user login, password and SNMP v3 account.
5 Batch change network protocols
Eliminating the need to change network protocol settings manually at multiple devices, system administrators can now apply a remote global change to the following settings: encryption strength; WSD (Encrypted Communication of Device) IPv4, NetBIOS over TCP/IPv4, Enable IPP Port 80 IPv4, IPP Port 80 IPv6, WSD (printer) IPv6, WSD (Scanner) IPv6, IPP (Port 631) IPv6, Permit SNMPv3 Communication, IPv4 and IPv6.
Latest Usability updates
1 @Remote Disconnection Notification 1/2
In the event of a disconnect in @Remote communication, users will be notified of the disconnection along with its cause and the appropriate action. (in 3 cases).
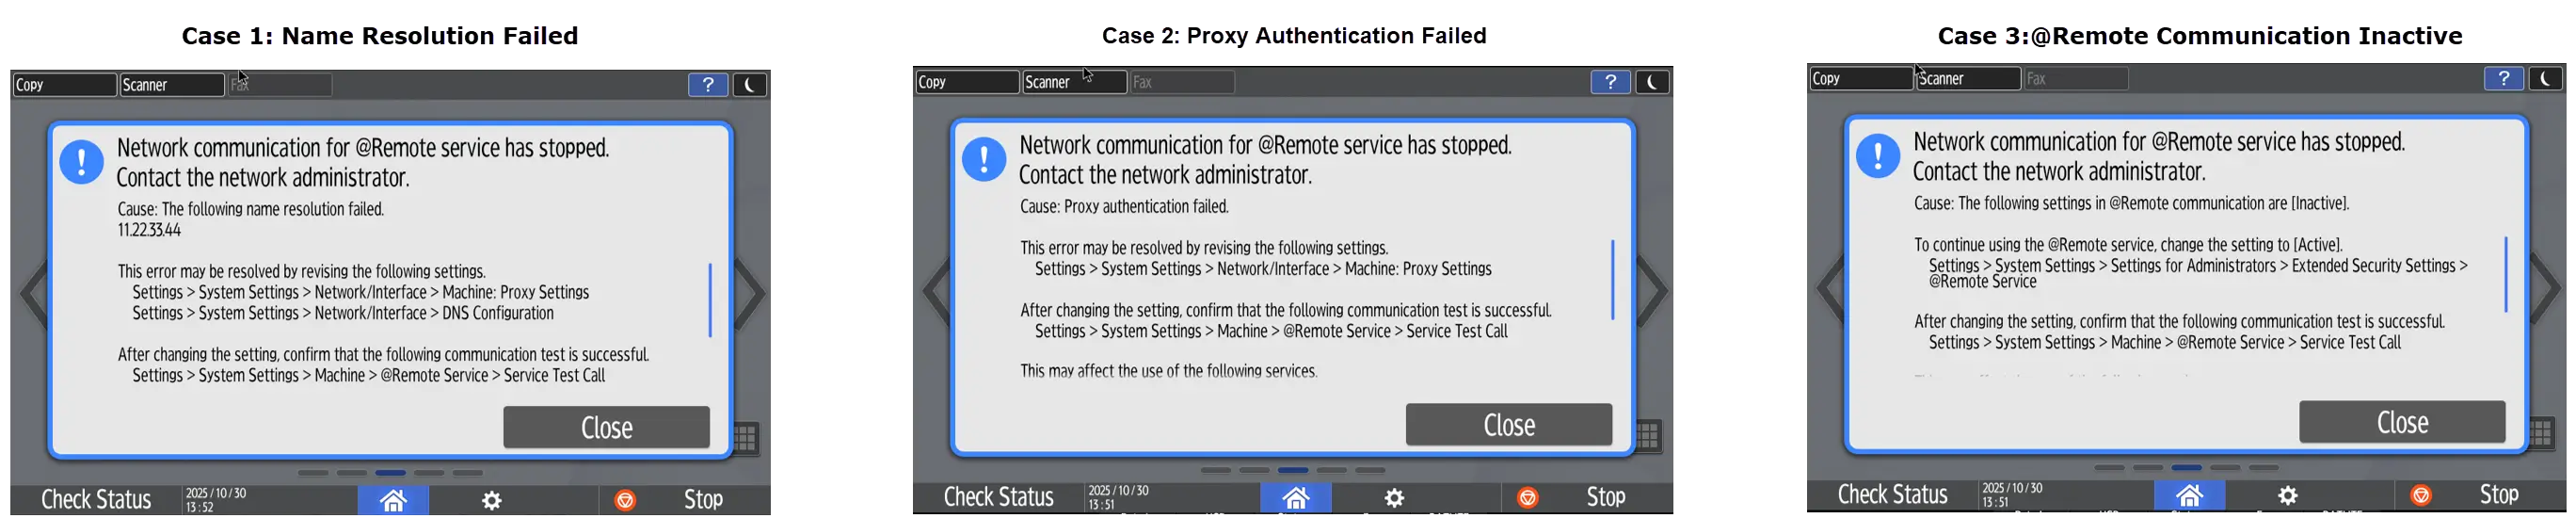
- All 3 cases can be resolved by the customer changing their settings.
- If adoption is insufficient, a pop-up appears every other day.
- Interval configurable via SP.
@Remote Disconnection Notification 2/2
Notification Setting Ways:
Settings surrounded with red box will be added when v2.4 is activated.
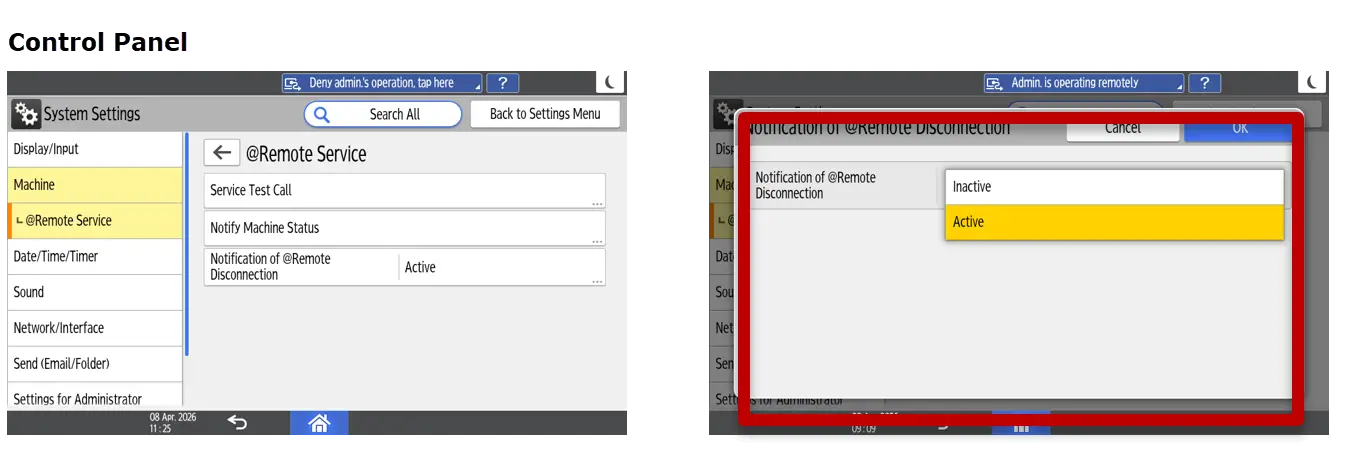
Configuration: [System Settings]▶[Machine] ▶[@Remote Service] ▶[Notification of @Remote Disconnection]
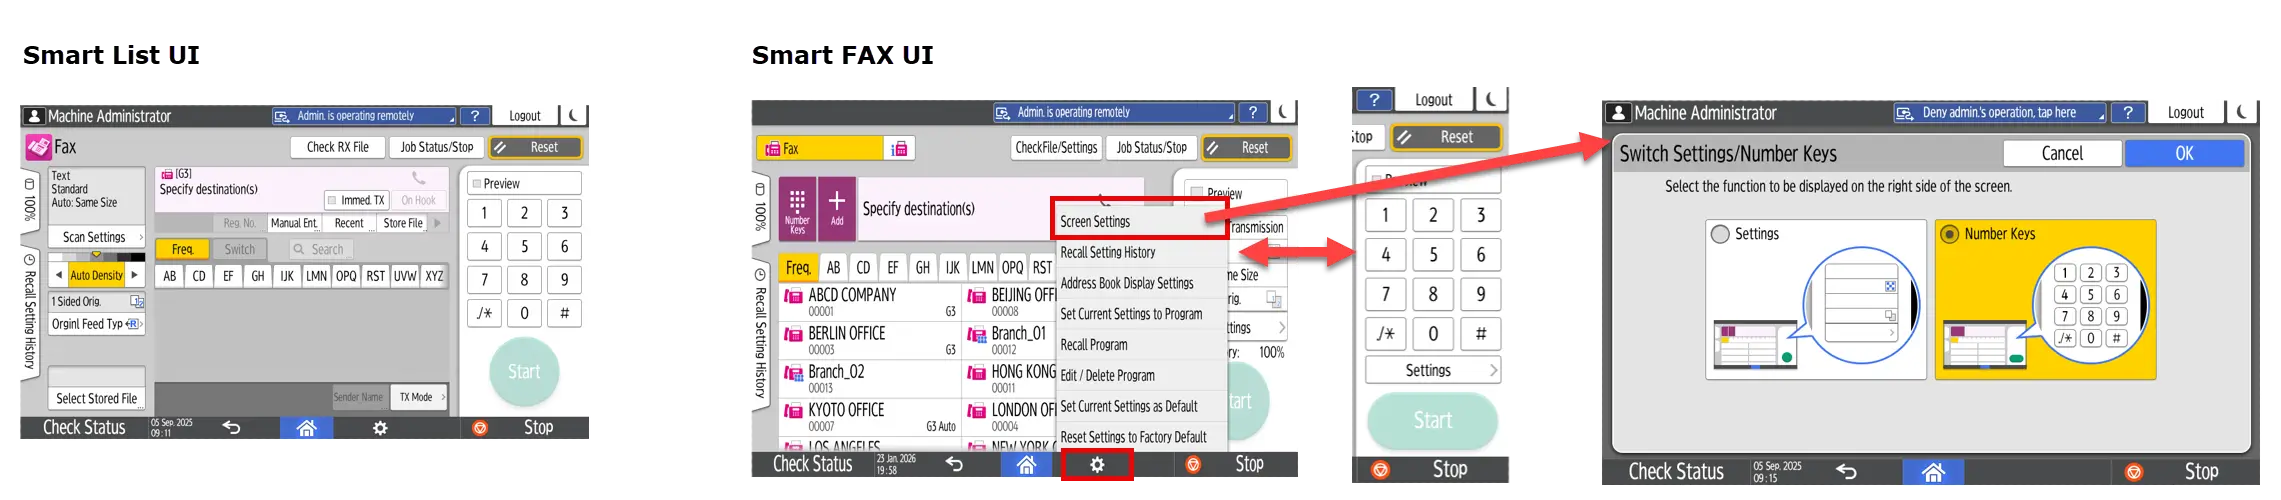
2 Support for Smart List UI for Fax and Scanner/Default Display of Smart Fax Ten-Key
- Provide the Smart List UI for Fax and Scanner functions as well.
- Enable the default display of the Smart Fax Ten-Key.
Limitations
Only models with Cheetah G3 (10inch panel) are supported.
Configuration: [Smart Fax]▶[⚙] ▶ [Screen Settings] ▶ [Switch Screen Type]/[Switch Settings/Number Keys]
3 User Registration Support for Quick Operation Keys in Fax Smart List UI
On the fax screen of the Smart List UI, users can register Quick Operation Keys just as they did in the legacy UI.
Limitations
Only models with Cheetah G3 (10inch panel) are supported.
Configuration: [Fax Settings]▶[Others] ▶[Quick Operation Key]
4 Smart Scanner: Addition of Irregular Document (Partial Reading) Function
- The Smart Scanner did not have the partial reading function for irregular documents that the legacy scanner had, but it is now newly added.
- Allowing users to scan and save only specific parts of a document, such as barcodes or contract numbers.

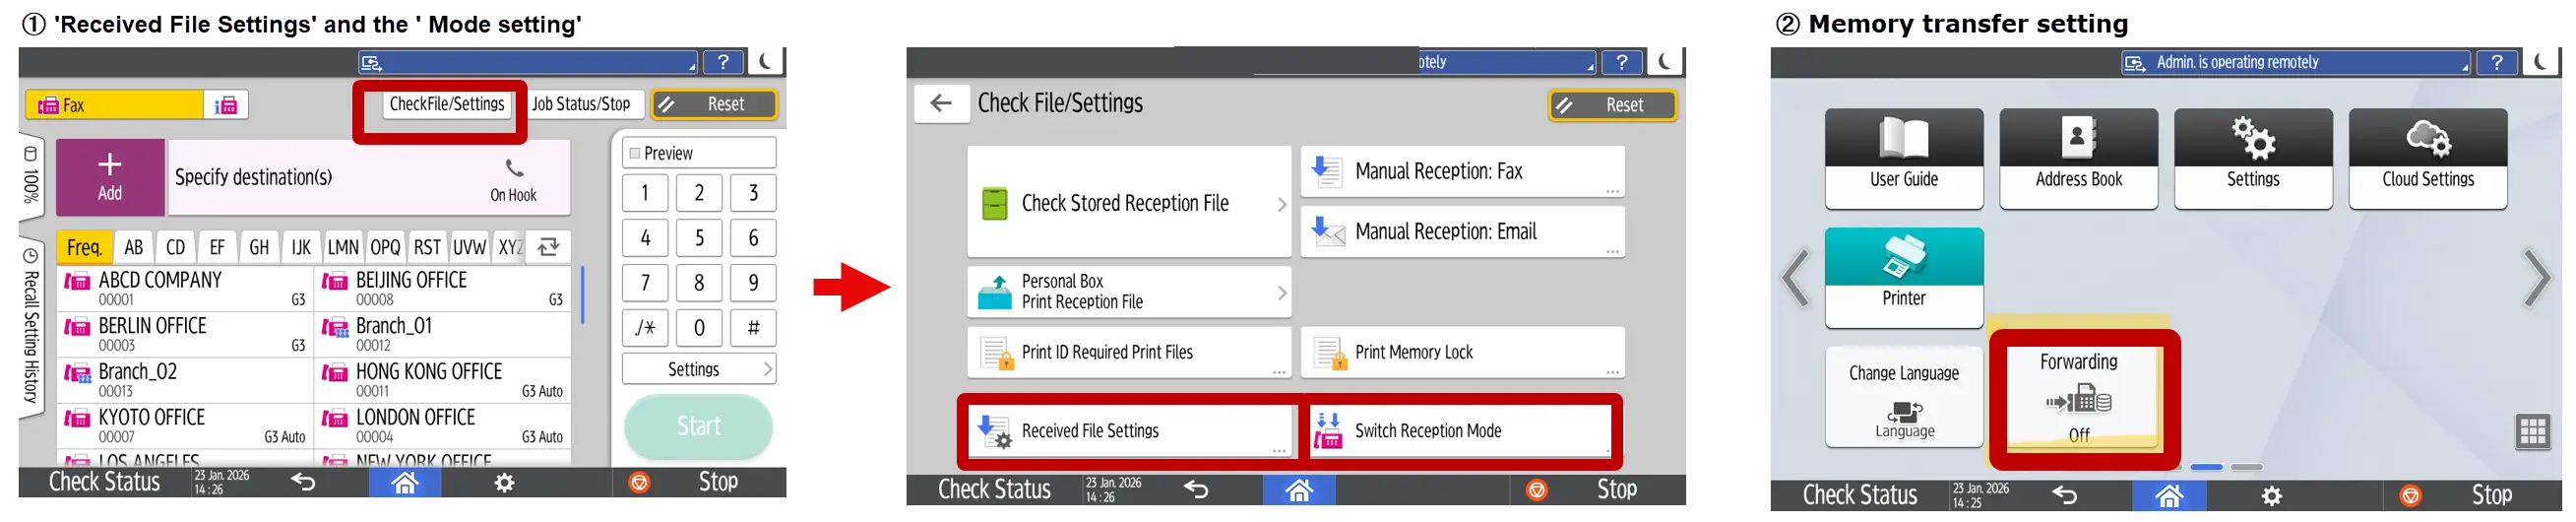
5 Legacy Catch-up: Fax Feature: UI Enhancements for Changing Settings
- The Fax app now allows you to configure detailed 'Received Document Settings' and the ' Mode setting' directly.
- A widget for Memory Transfer Settings has been added.
Limitations
Models with Cheetah G2.5 are not supported.
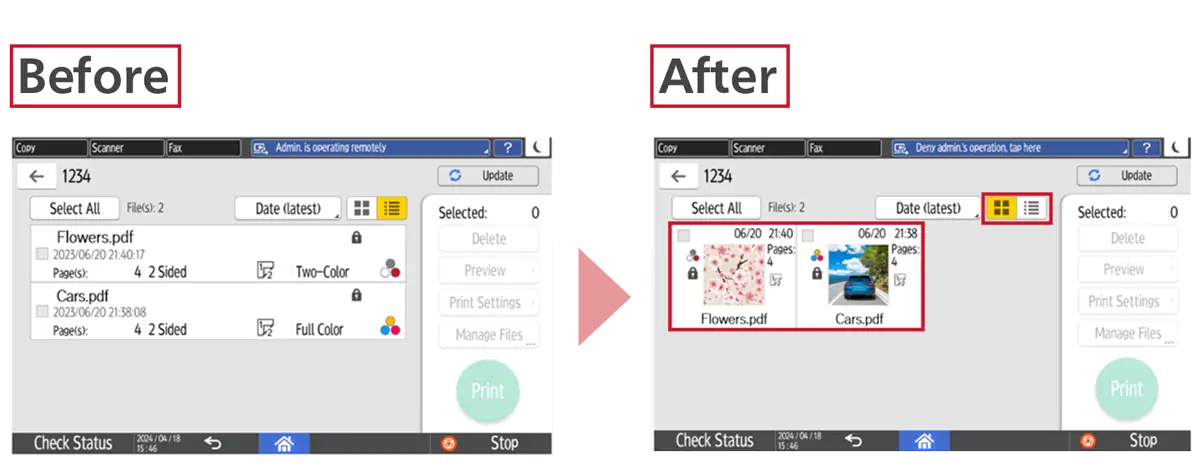
1 Display Thumbnails in Quick Print Release
Display Thumbnails Option is available in Quick Print Release.
2 PC Identification of the Source for P1 Command Errors
By referring to the Error Log, users can find out which PC is causing the P1 command error. Displays the IP address of the originating PC.
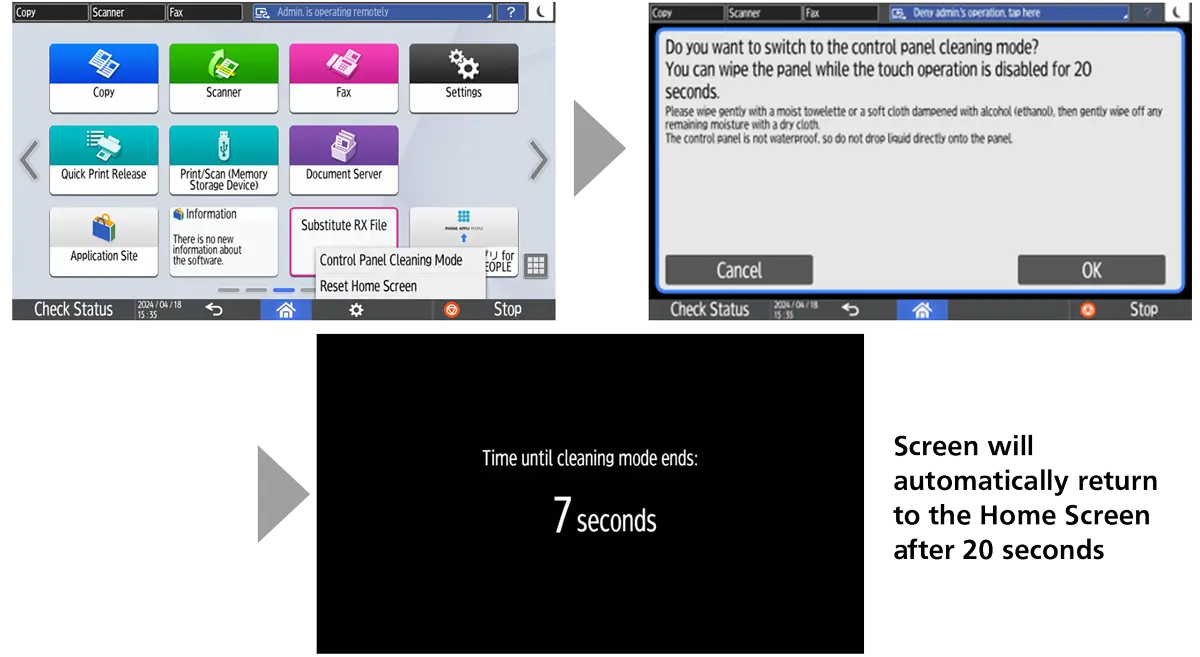
3 Cleaning mode for control panel
Users can turn the control panel to “Cleaning mode” to clean/wipe-off the stain or dust on the screen. When “Cleaning mode” is ON, the screen will turn black and touch operation will be disabled for 20 seconds.
How to set
- [Home Screen] ▶ [⚙Menu key] ▶ [Control Panel Cleaning Mode]
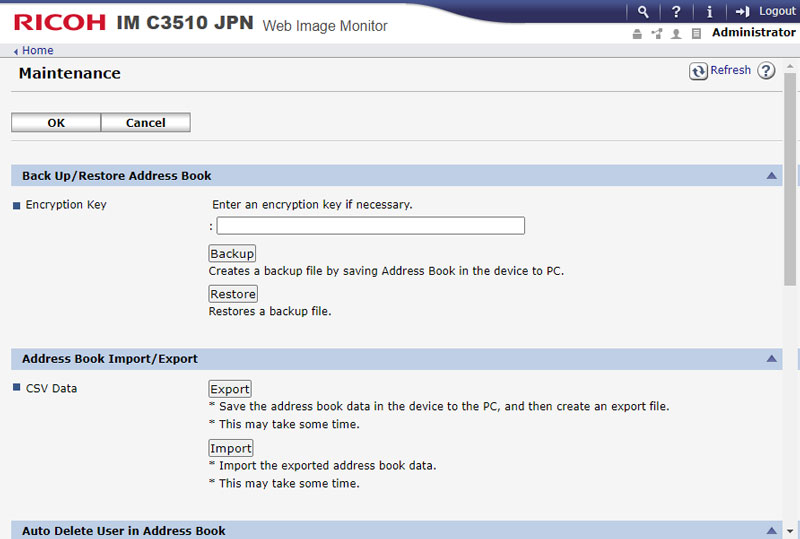
1 Importing/Exporting the Address Book using Web Image Monitor
- Do this operation in [Device] > [Address Book] > [Maintenance] > [Address Book Import/Export] Management
1 Usability Improvements when browsing the network and failing due to input error
You can interrupt the search on the network for a destination folder of SMB transmission and the connection test when use the Send to Folder or registering a folder in the Address Book.
When you notice a mistake, you will be able to interrupt the network reference and edit it immediately. It can reduce time spent waiting for timeout.
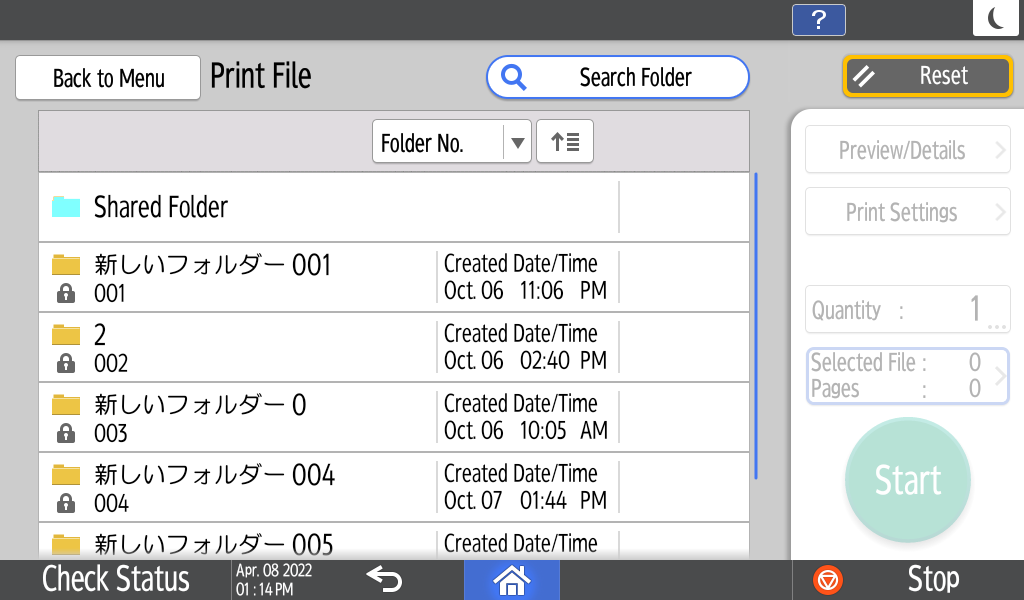
1 Support New User Interface in Document Server
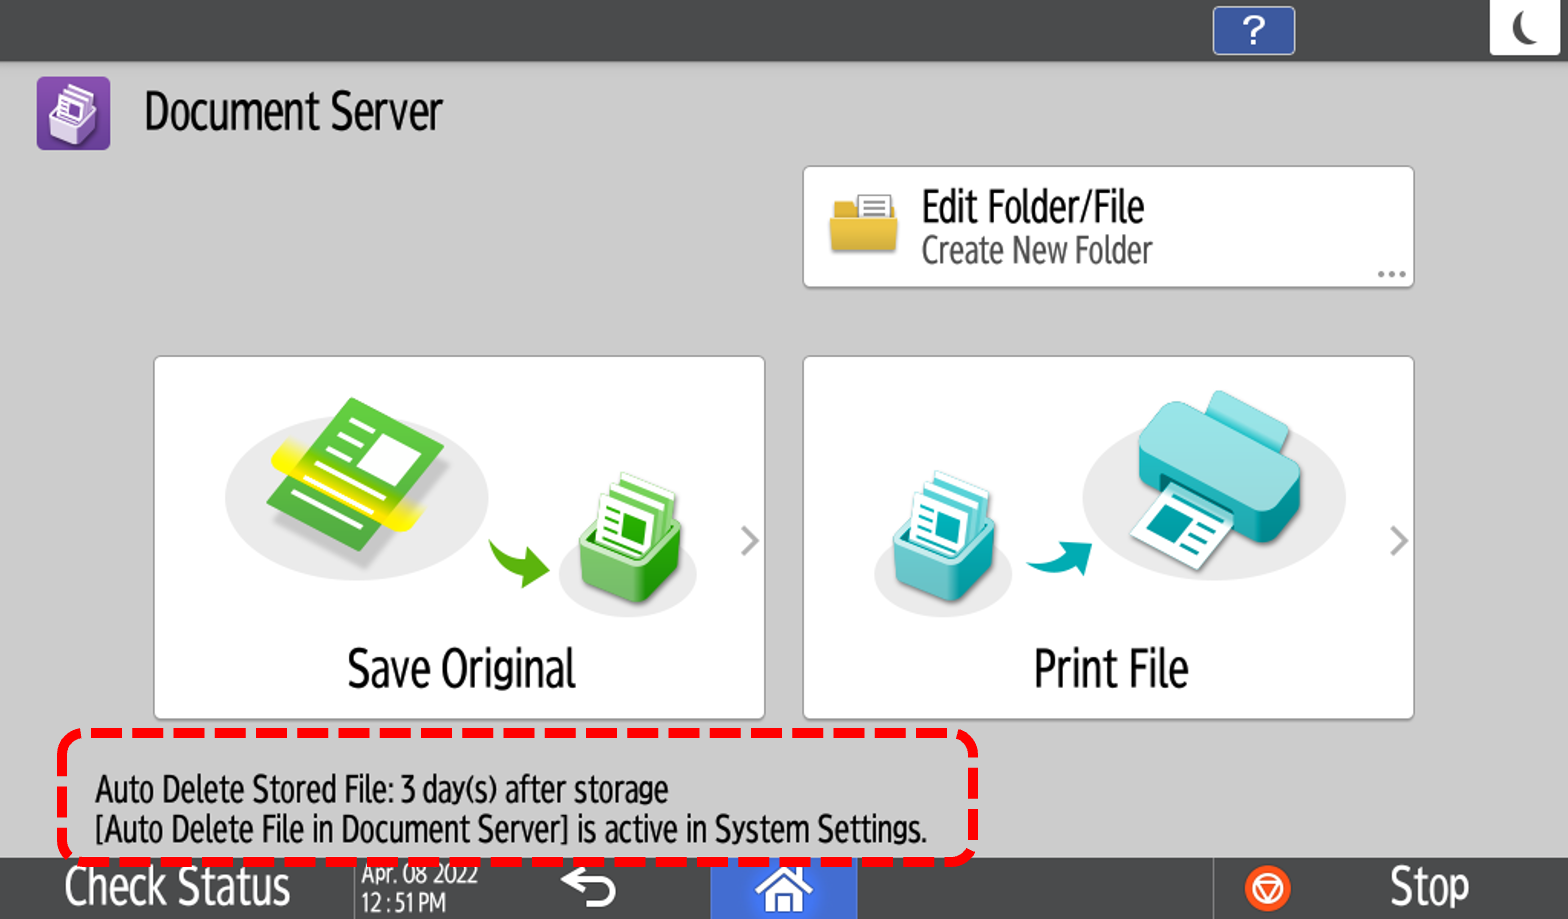
- Top screen
You can find notification for files in auto delete are shown in the top screen.
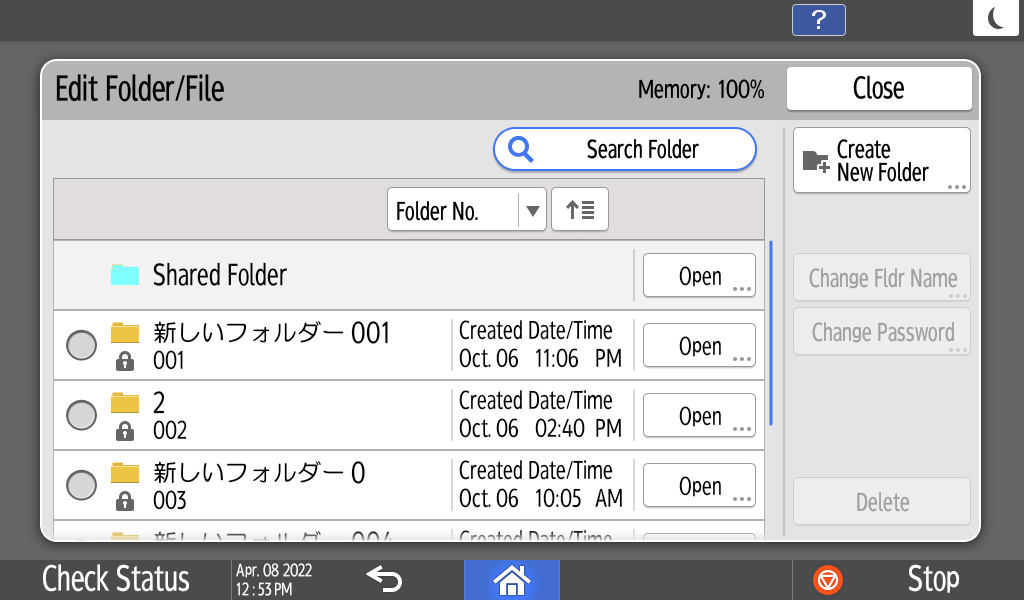
- Edit folder/file
You can edit a setting of folders and files on screen with new UI.
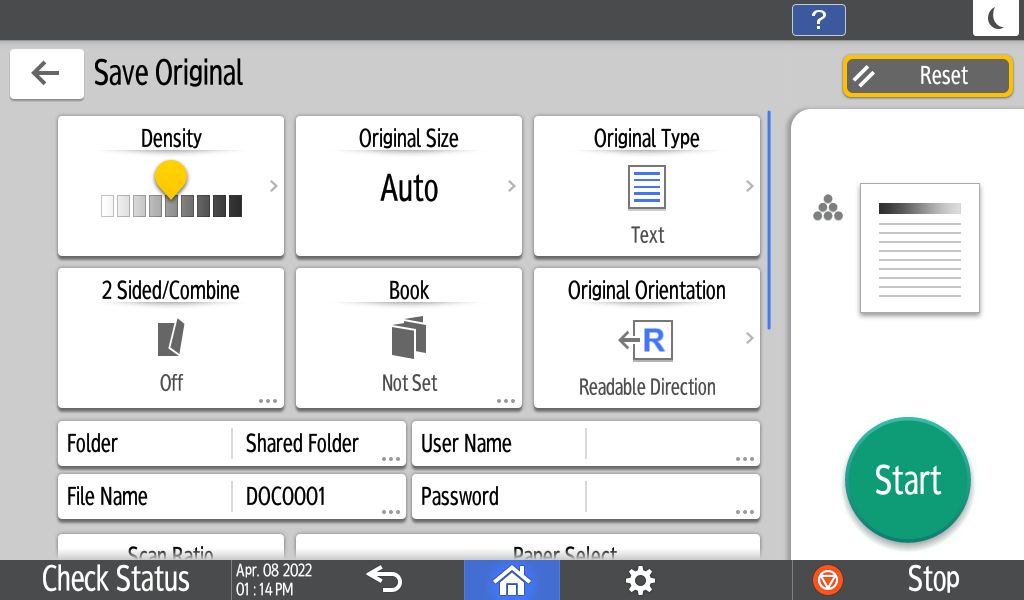
- Save original setting (Copy)
You can select original setting for copy with new UI.
- Print file
You can select files and change print settings on the screen with new UI.
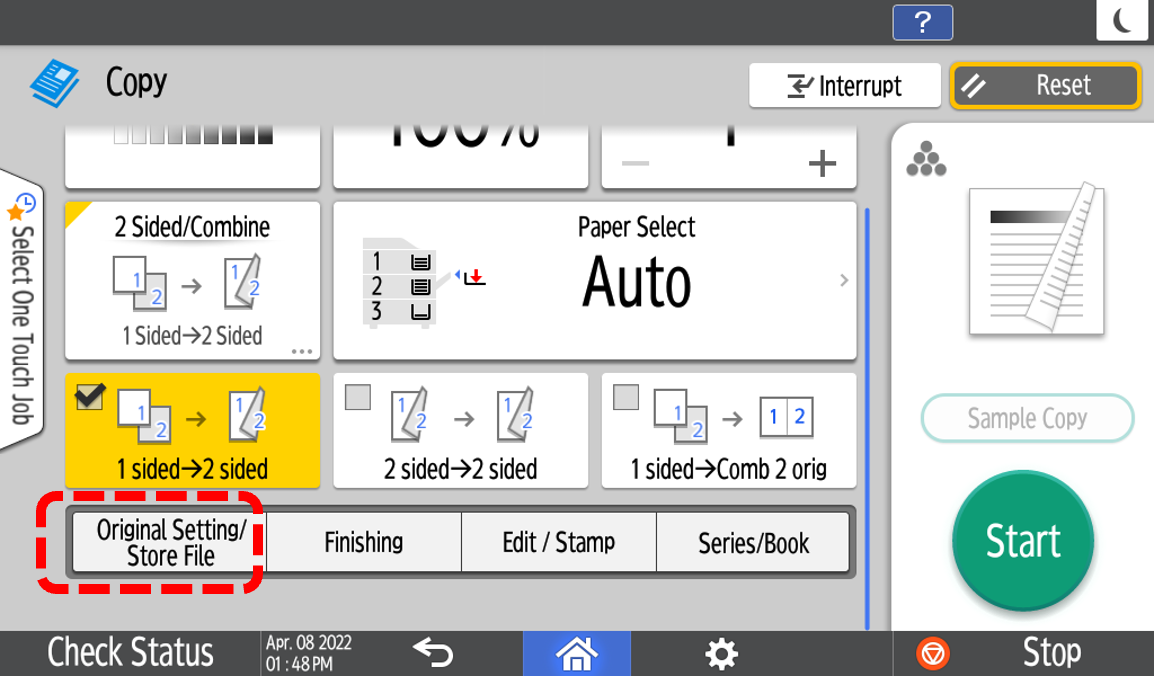
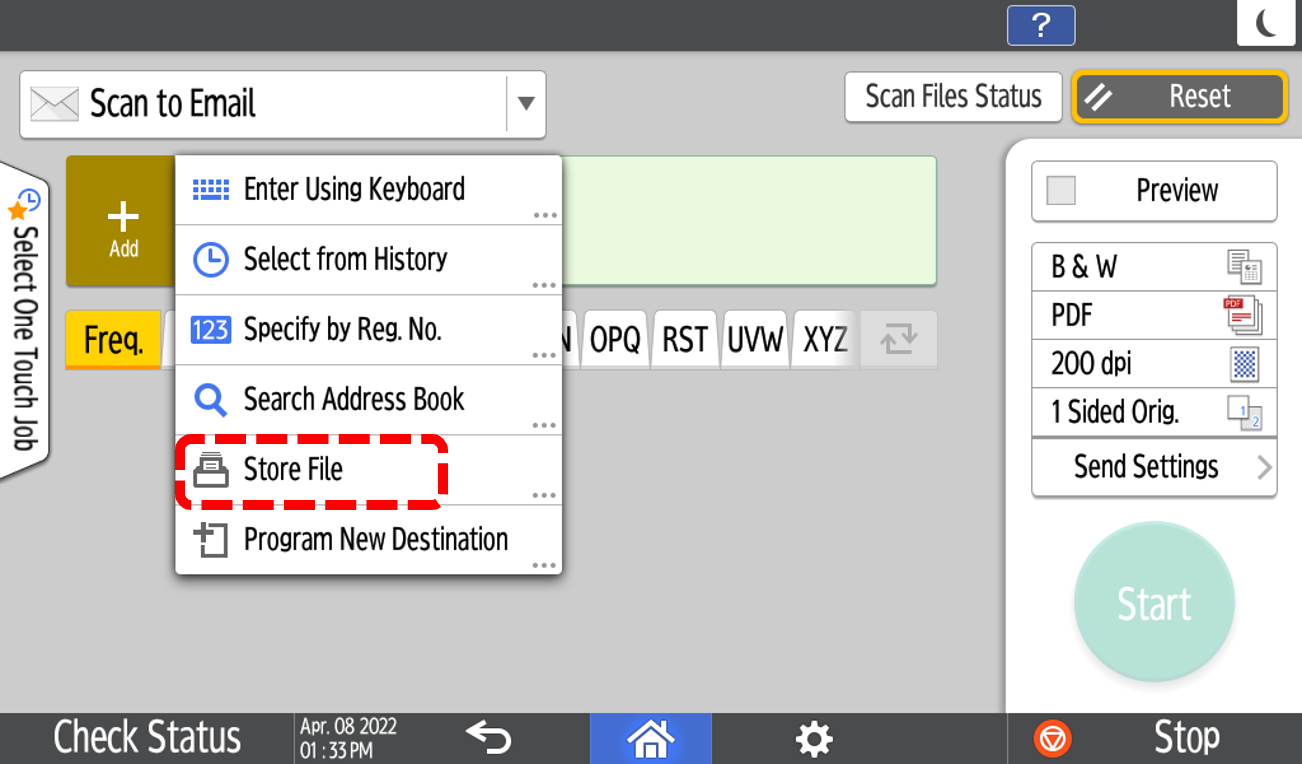
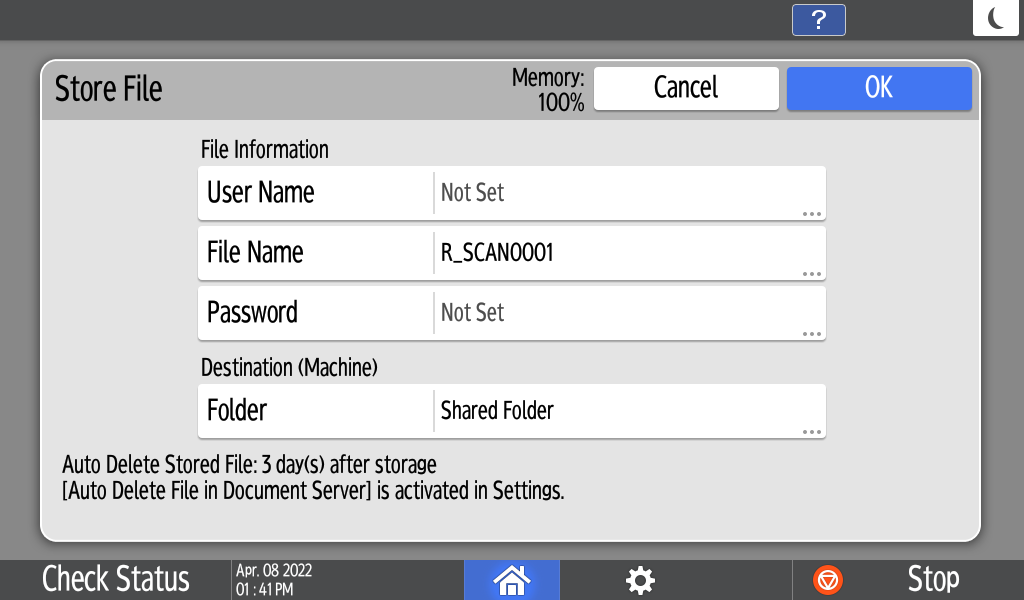
2 Support New User Interface in Store File (Scan/Fax/Copy)
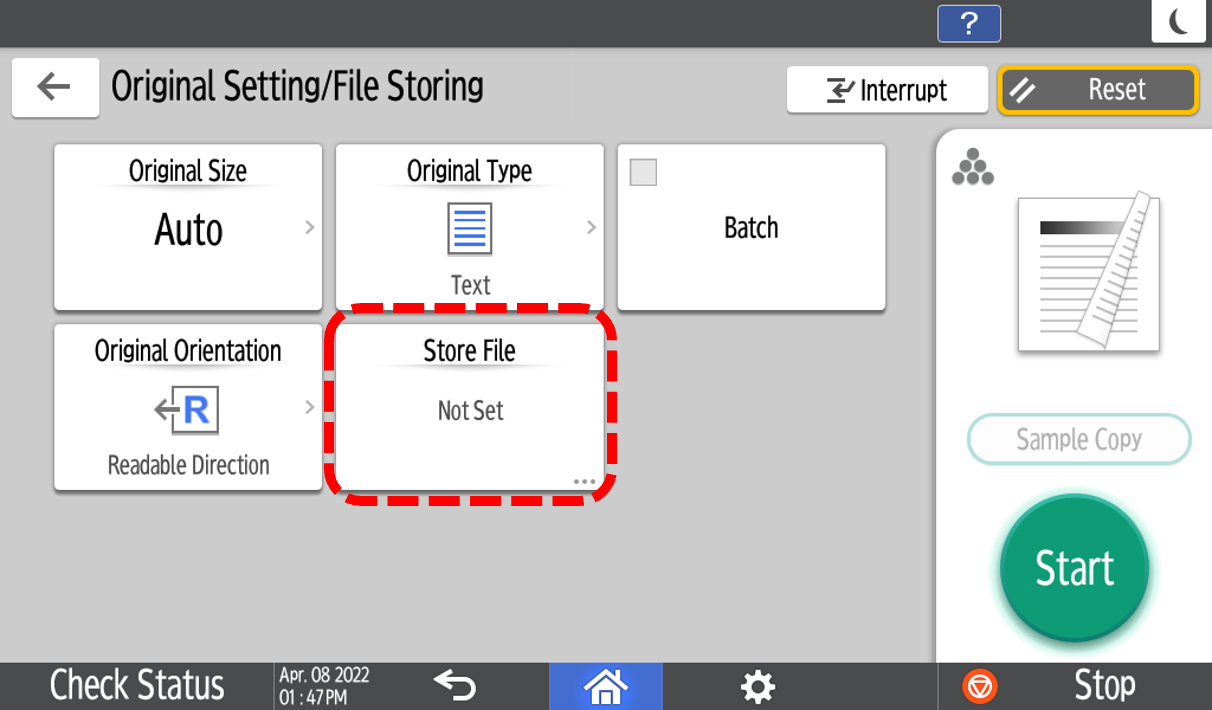
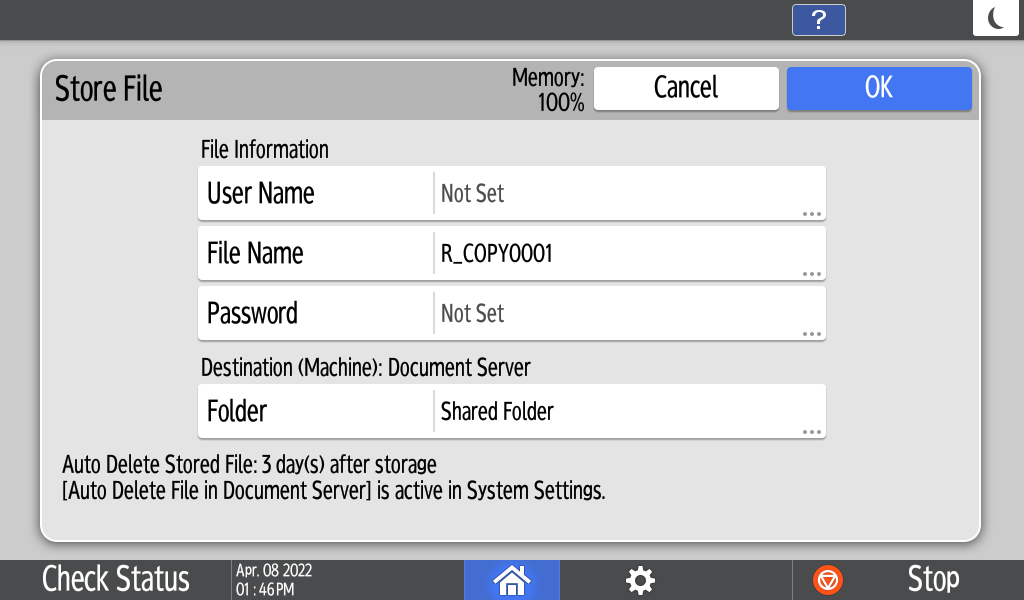
To minimise operation time of save & Scan/Fax/Copy, you can save files to the storage and Scan/Fax/Copy files at the same time.
- Store file (Copy)
- Store file (Scan)
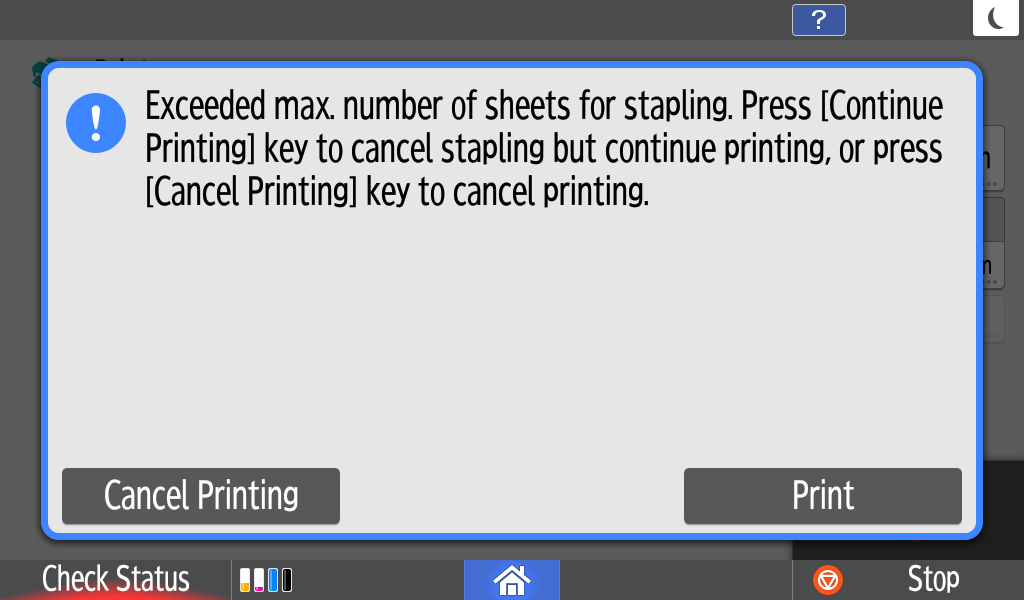
1 Print cancellation when stapling limits exceeded
To reduce waste, if the maximum staple limit is exceeded, the device will alert the user and pause the job before it is printed. The user is given the option to cancel printing or continue without stapling.
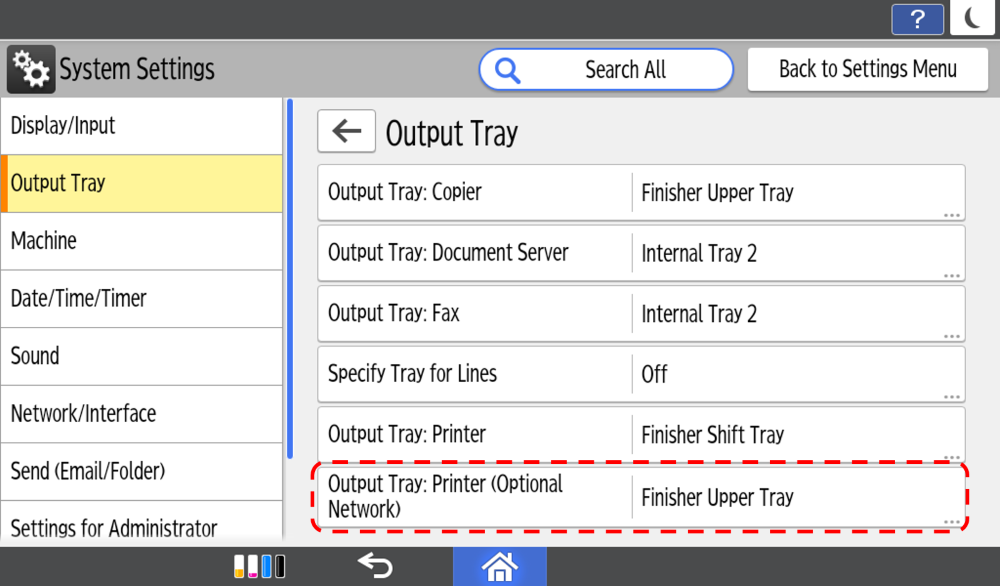
2 Output tray selection
To make it easier to identify output, it is now possible to pre-select an output tray for a second print network (optional NIC port required).
Latest Smart Fax updates
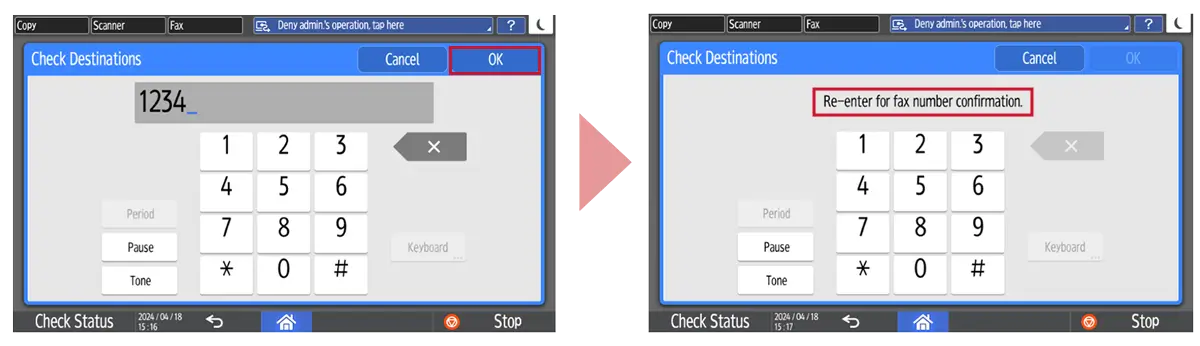
1 Preventing a FAX Transmission to the Wrong Destination
Sending a fax only after entering the destination twice for confirmation.
This function is newly available for IP-FAX, it was originally only available on the G3 FAX.
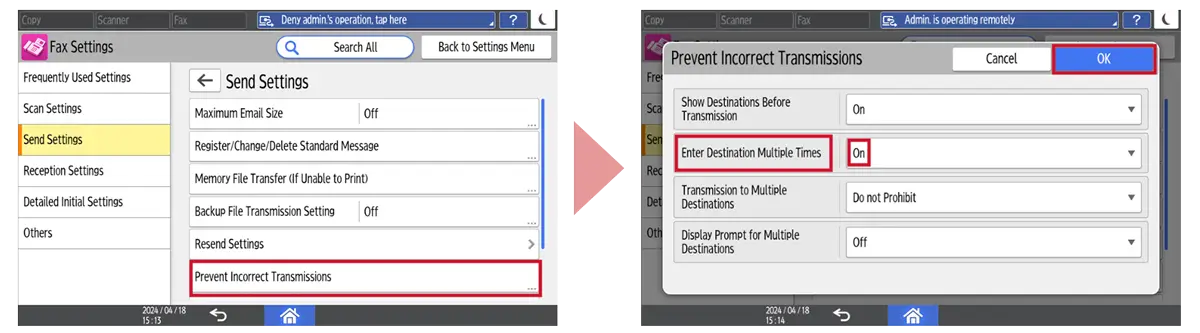
How to set:
- [Fax Settings] ▶ [Send Settings] ▶ [Prevent Incorrect Transmissions] ▶ [Enter Destination Multiple Times] ▶ [ON] ▶ [OK]
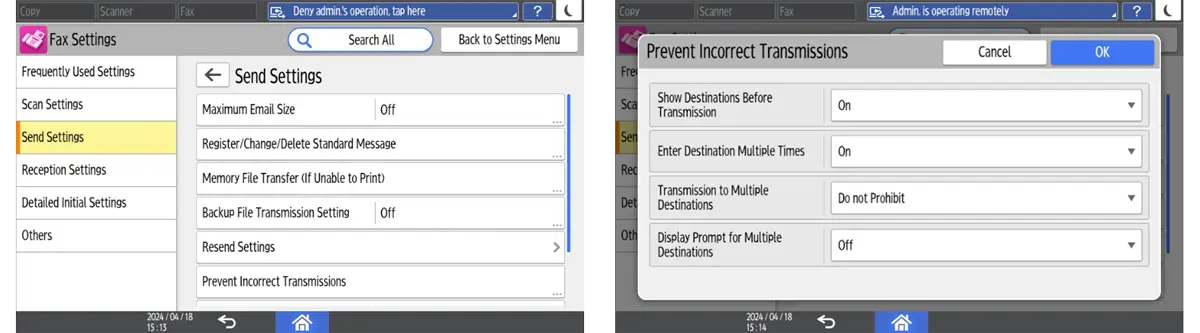
2 Centralized management of settings when receiving faxes and easy confirmation
Add a new screen that allows the user to check the contents of each setting related to reception in the FAX settings
Operation settings for document reception, timer settings for output switching, specific destination settings, etc.
How to set:
- [Settings] ▶ [Fax Settings] ▶ [Others] ▶ [List of Actions on Receiving File]
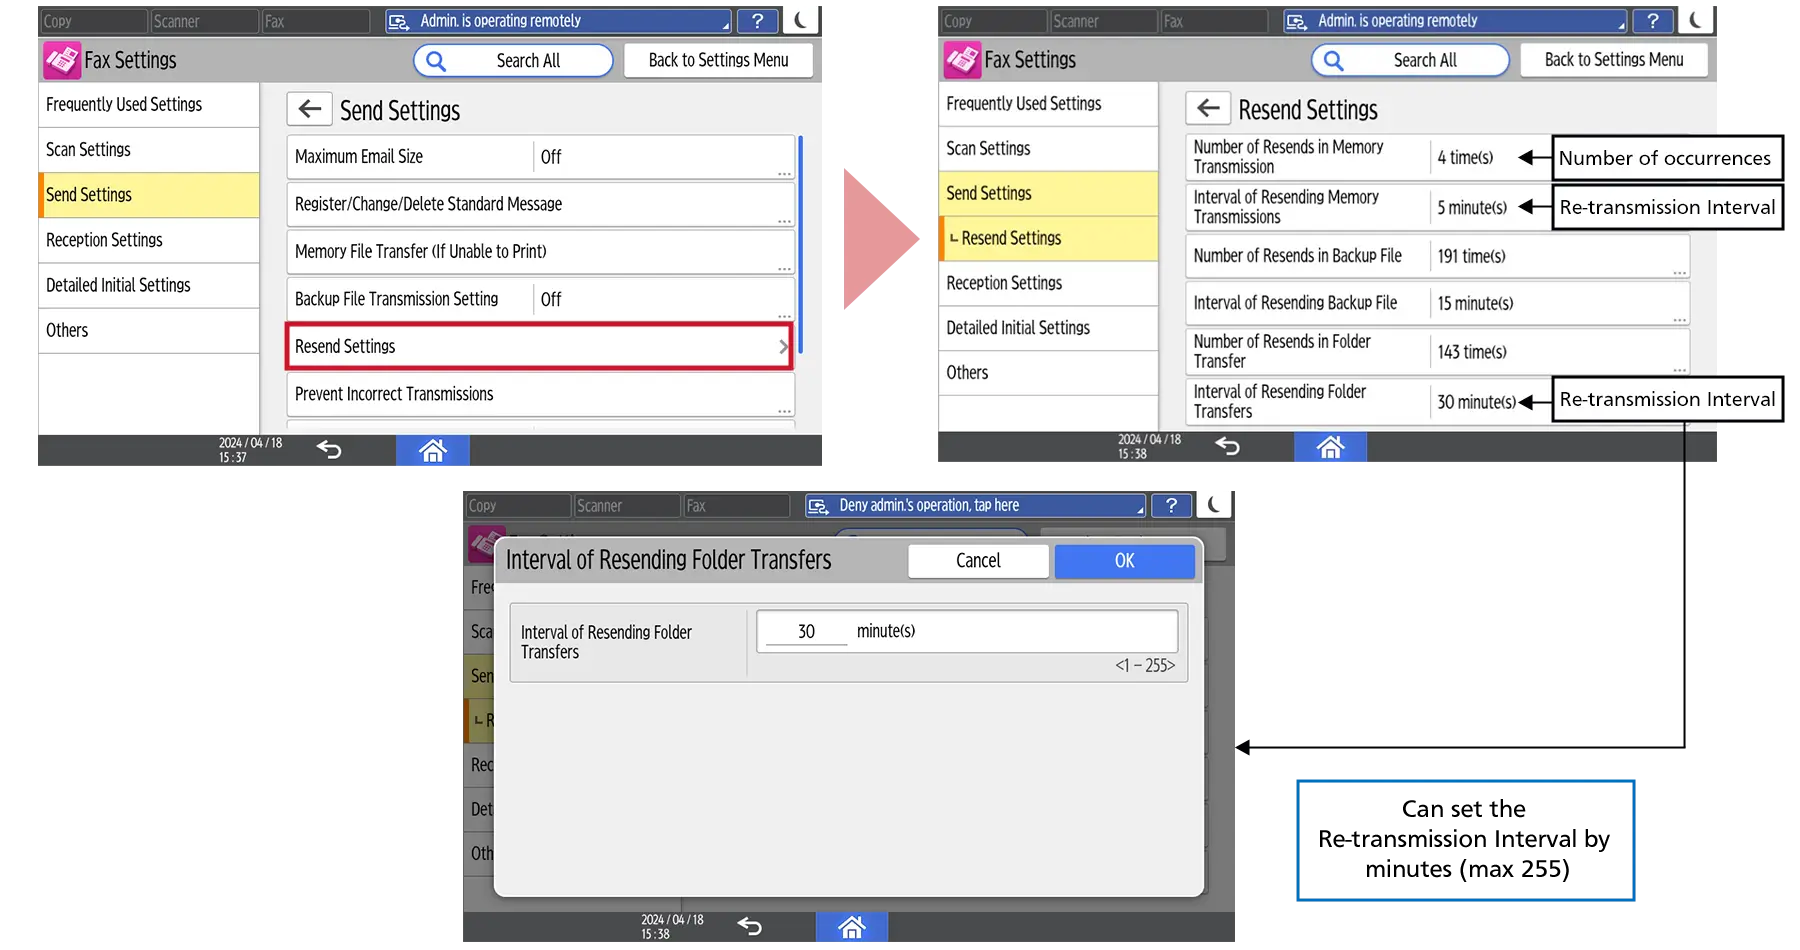
3 UI for FAX parameters
The following settings that could only be set in BitSW/Parameter settings will be set in FAX settings.
- Re-transmission interval for Memory transmissions
- Re-transmission interval for Backup transmissions
- Re-transmission interval for Folder transfer
How to set:
- [Settings] ▶ [Fax Settings] ▶ [Send Settings] ▶ [Resend Settings]
1 Fax Job Priority Setting
To avoid mix of fax and print jobs, the priority of printing fax job can be switched. It can be changed that Fax job is on hold until printing is completed or Print job is on hold until receiving/sending Fax is completed.
To enable this feature, please contact service engineer.
1 Error terminology improvements for FAX reports
The reason of errors in Fax reports are more detailed and easier to understand. You can easily find out the cause of the fax error without contacting the call center.
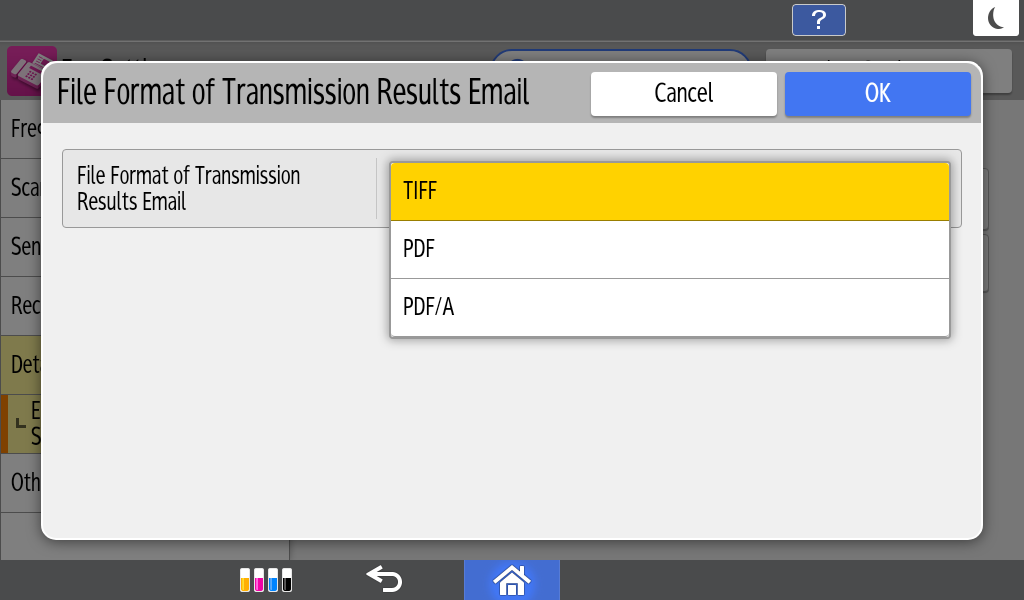
2 The file format of the transmission result report in FAX
Now you can choose the file format for the transmission result report not only from TIFF but also from PDF and PDF/A.
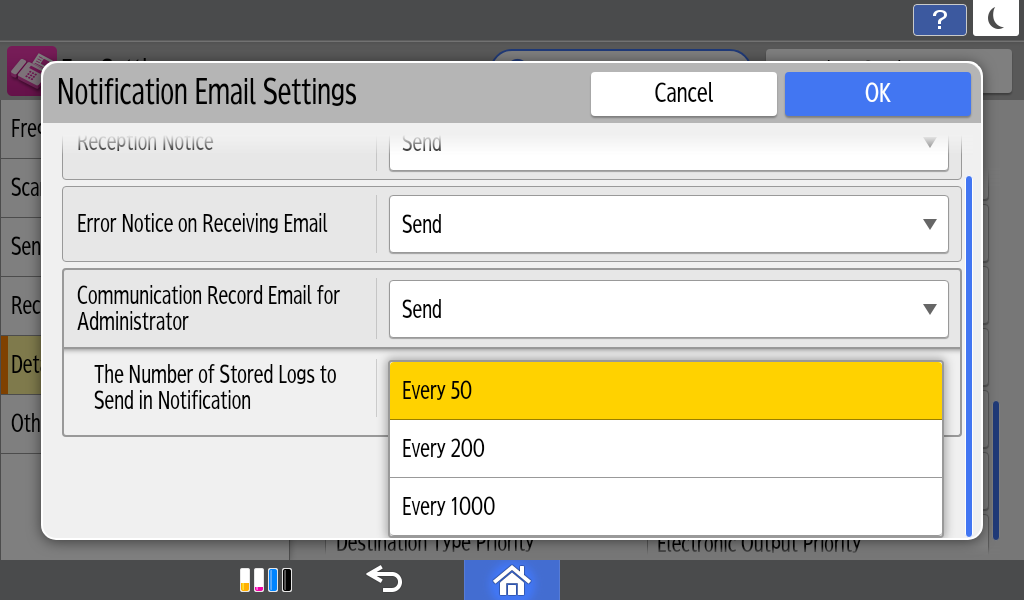
1 Fax communication records
User can change the frequency when you receive an e-mail with the fax logs. You can receive this email after 50, 200 or 1000 faxes.
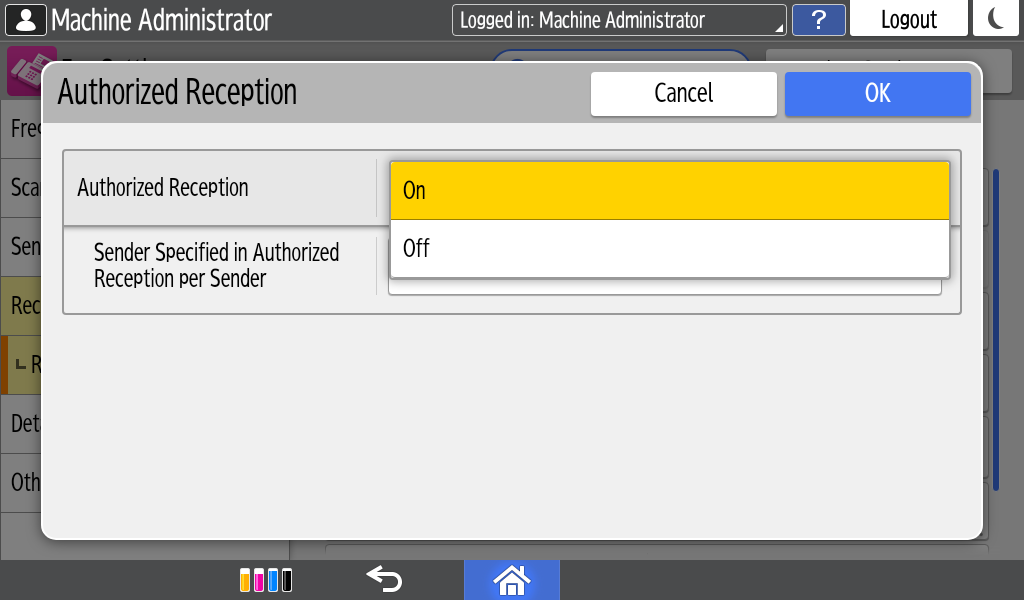
2 Prevent unwanted faxes
Unwanted senders can now be blocked by selecting fax numbers directly from fax reception history, instead of manually entering numbers.
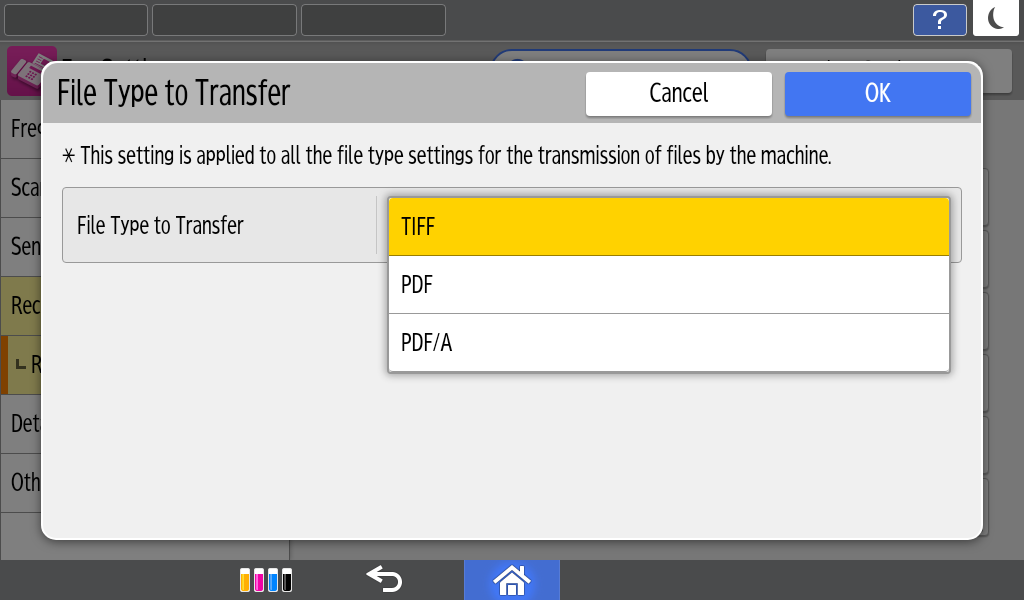
1 File type in the setting of Fax Memory Transfer
- Enable a file type in the setting of Fax Memory Transfer
- Available file types: TIFF, PDF, PDF/A
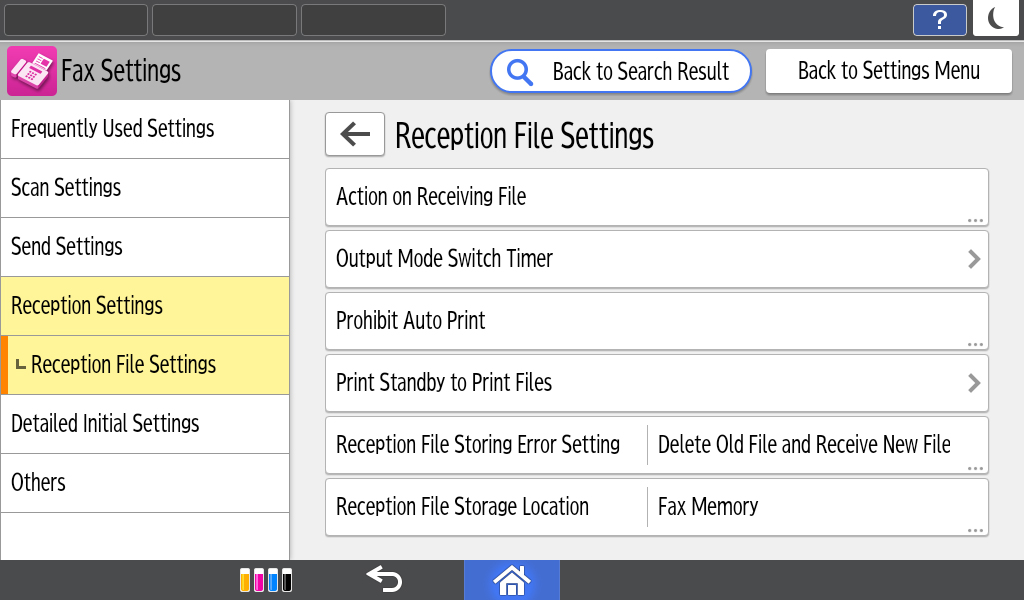
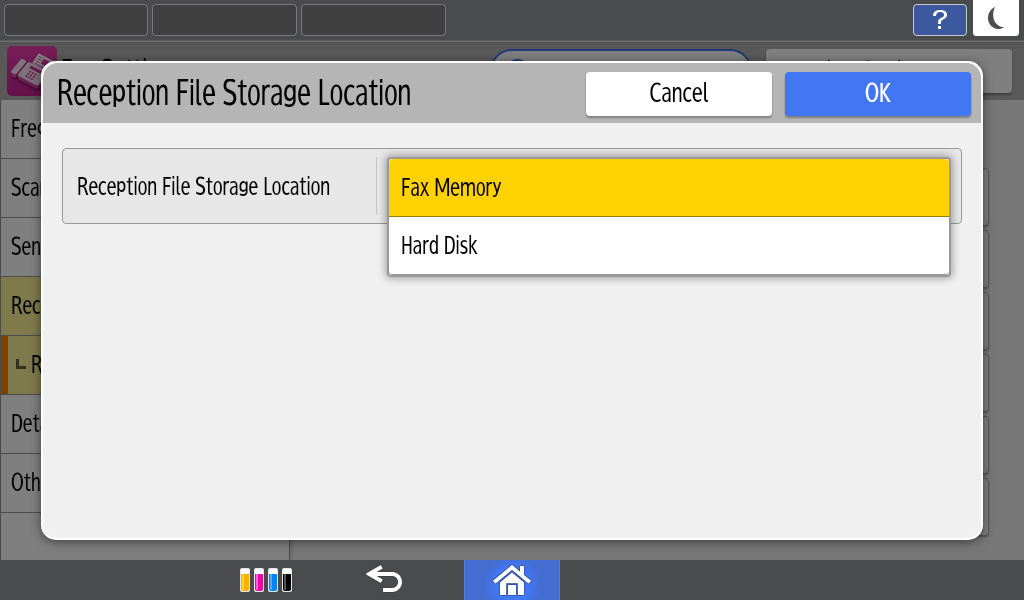
2 Fax Reception File Storage Location
- The “Reception File Storage Location” function is added to Fax Settings
Latest Setting updates
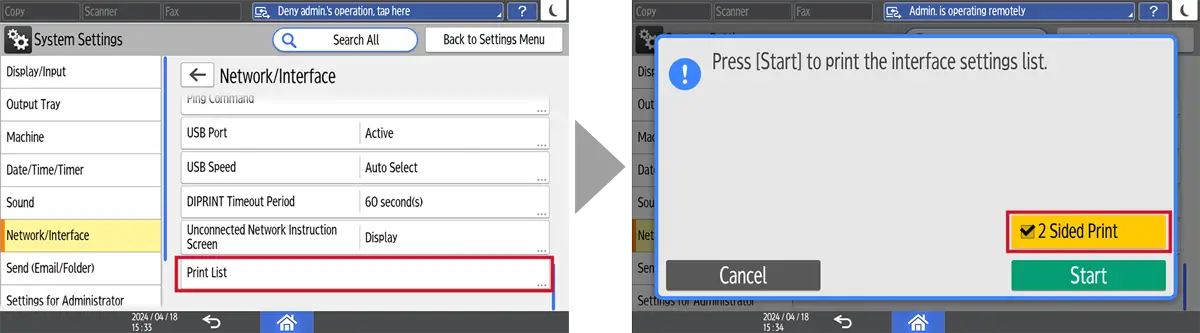
1 Print on both sides when printing interface settings list from the device
Users can choose to print on both sides when printing interface settings lists.
How to set:
- [System Settings] ▶ [Network/Interface] ▶ [Print list] ▶ Check [2 Sided Print]
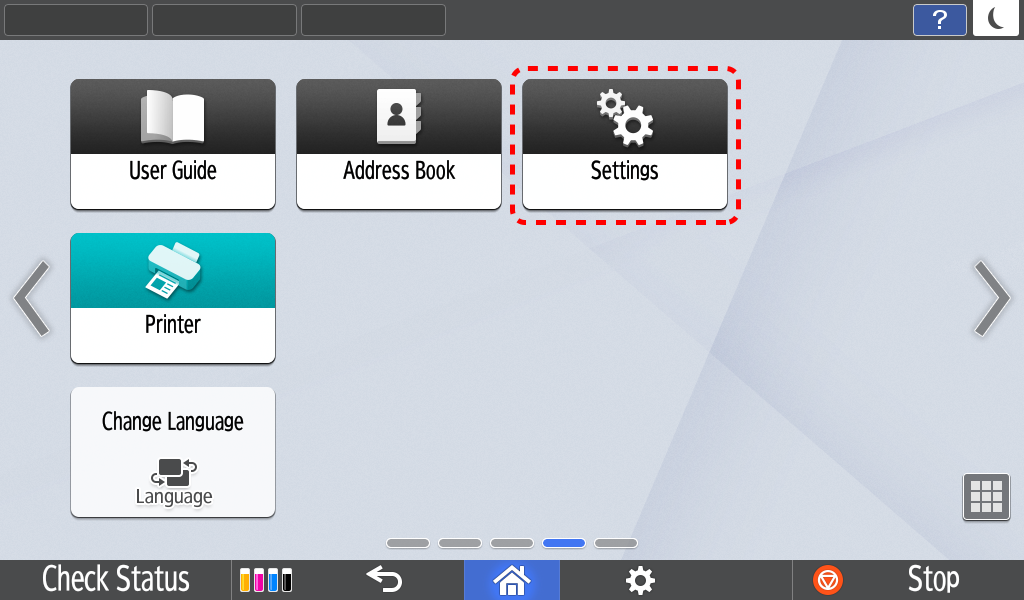
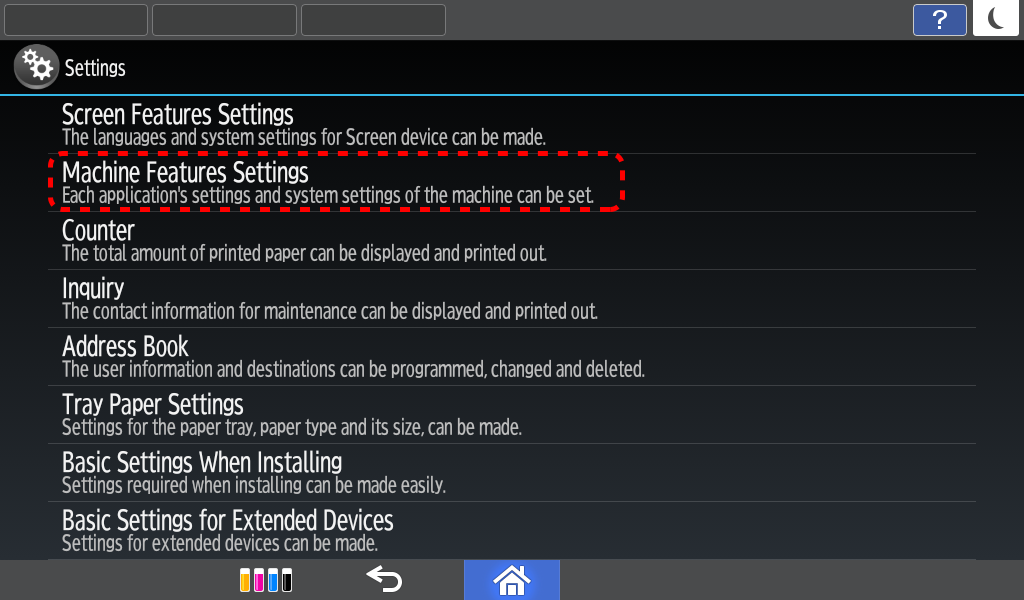
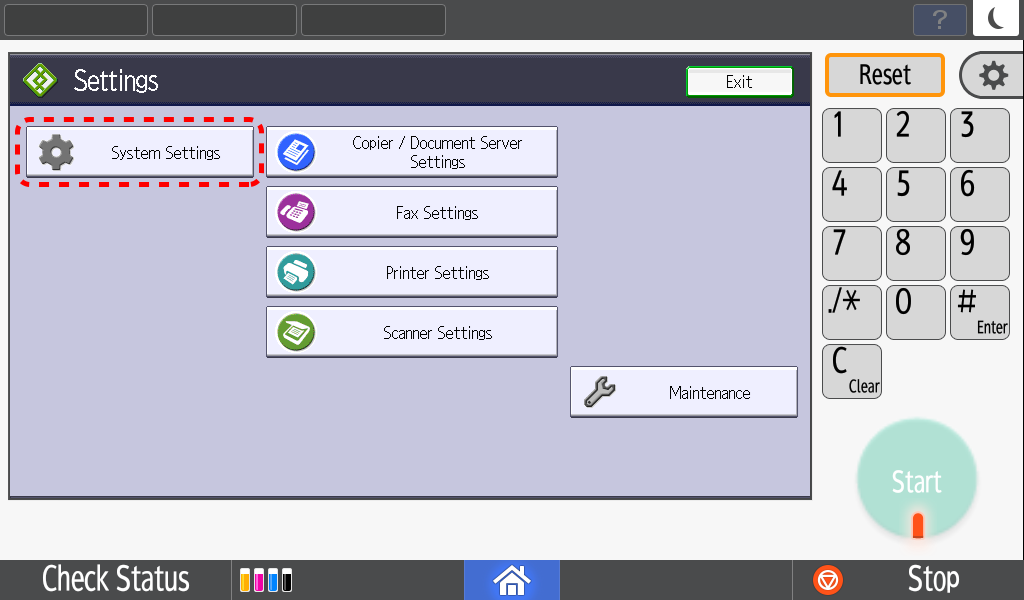
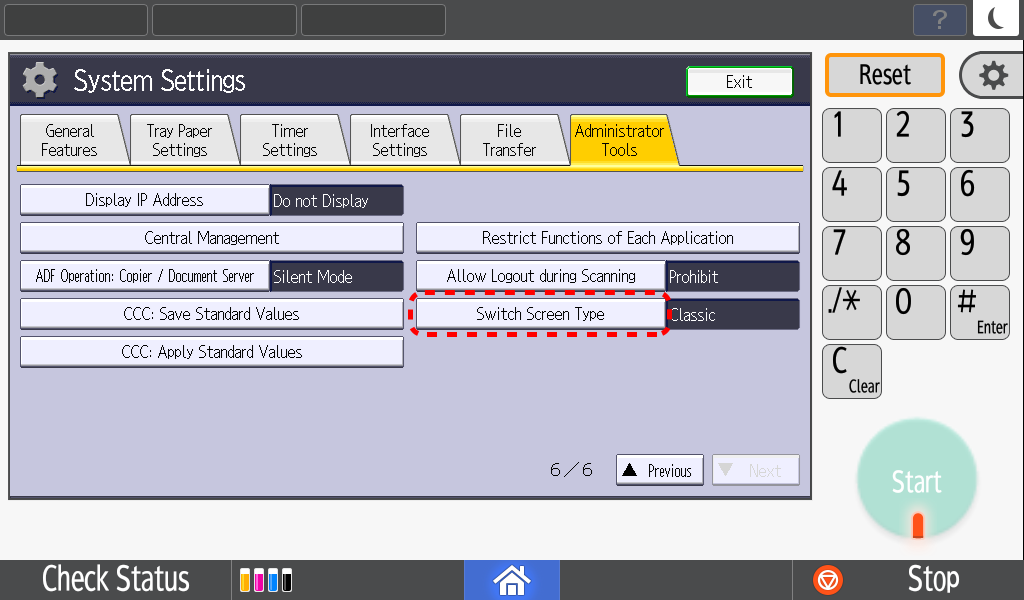
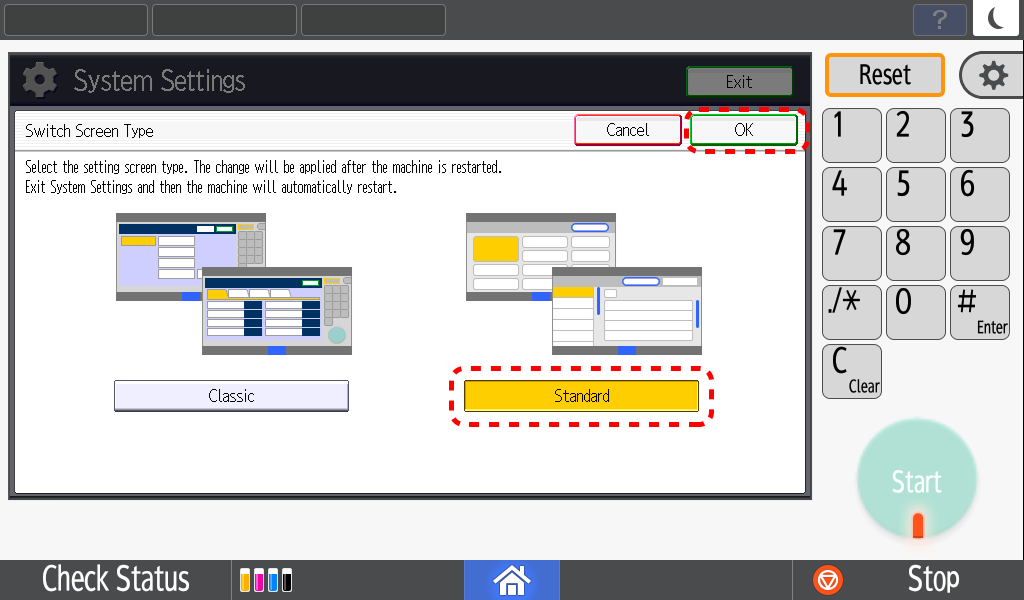
1 Changing of “Settings” interface from “Settings (Classic)” to “Settings (Standard)”
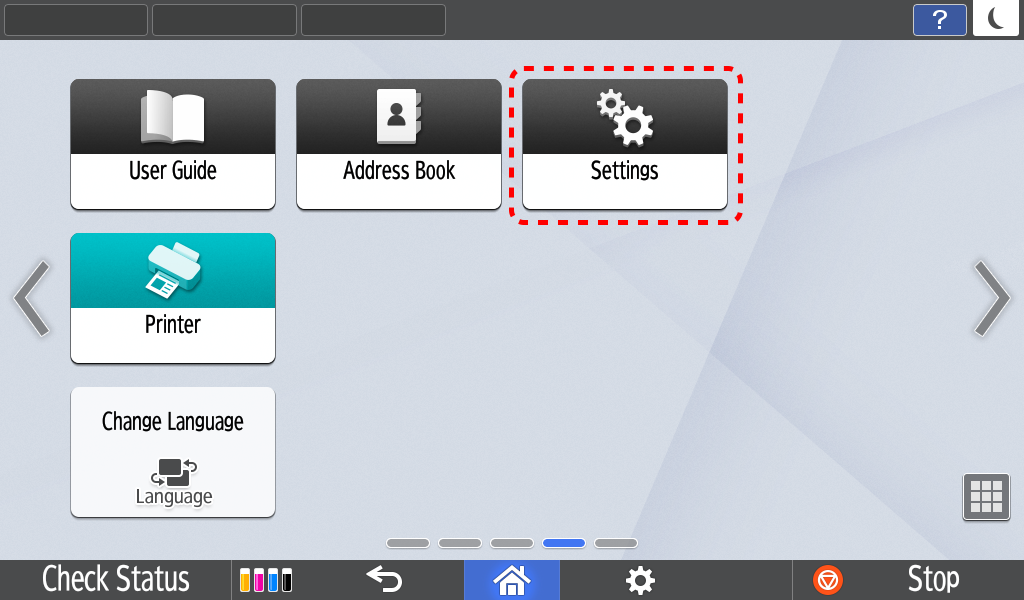
- Select Settings
- 1 Select Machine Features Settings
- 2 Select System Settings
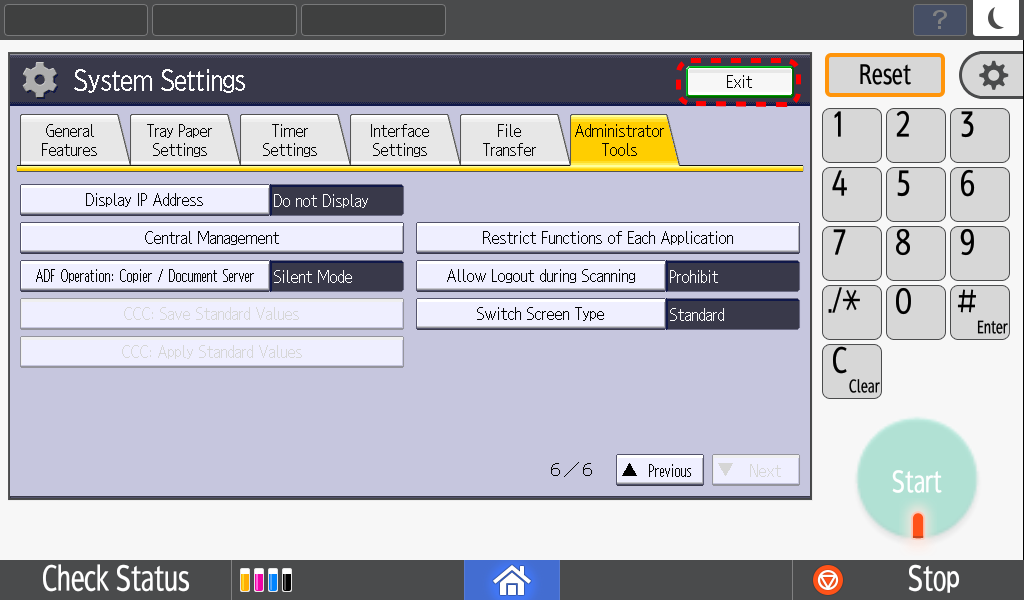
- 3 Select Admin Tools --> Switch Screen Type
- 4 Select Standard then press OK
- 5 Select Exit
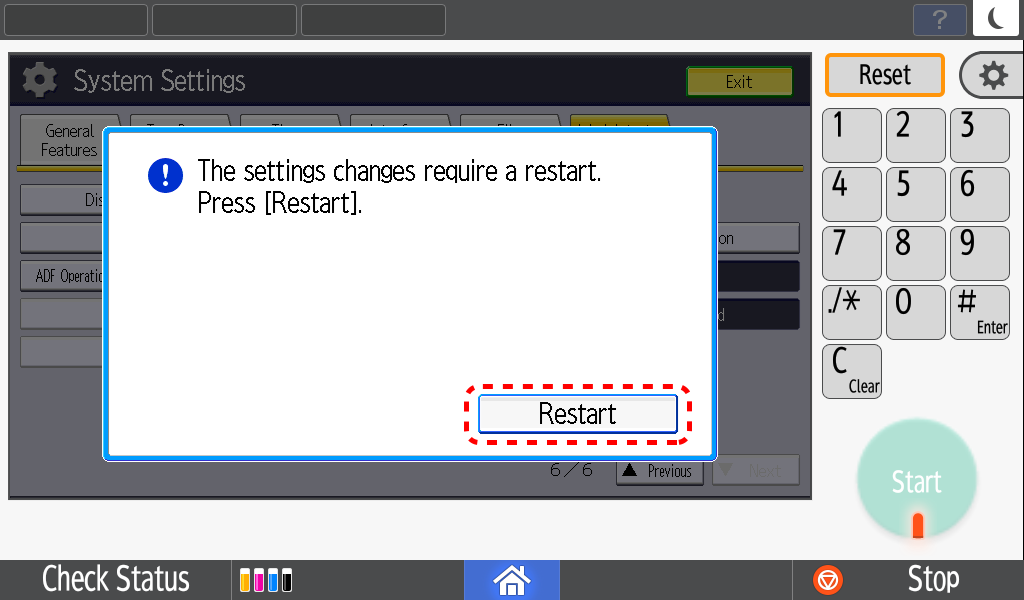
- 6 Select Restart
- 7 After restarting, select Settings
- 8 New Settings Interface is completed!
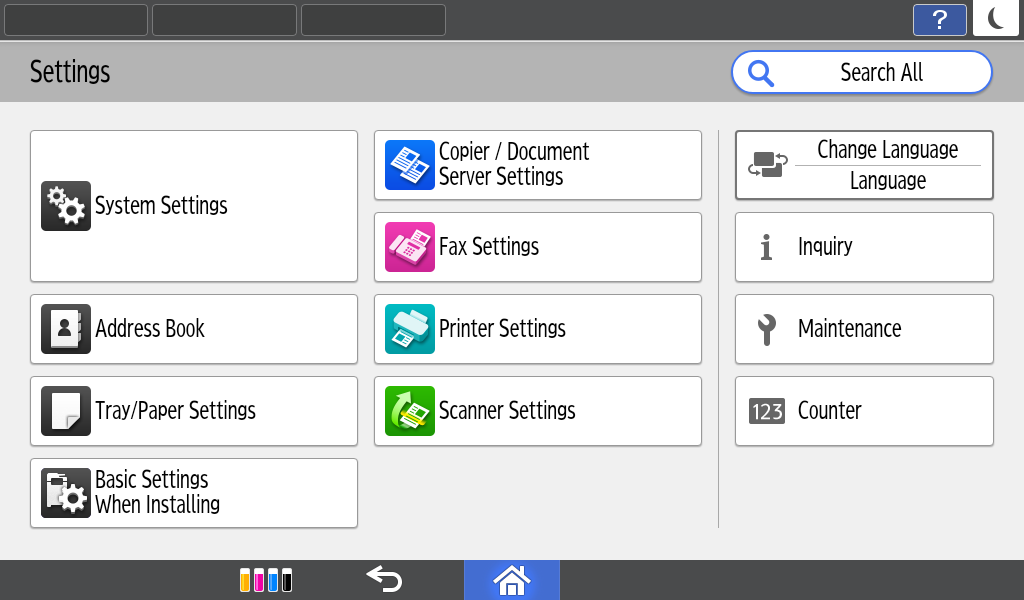
2 New user interface in Settings
- Settings Homepage
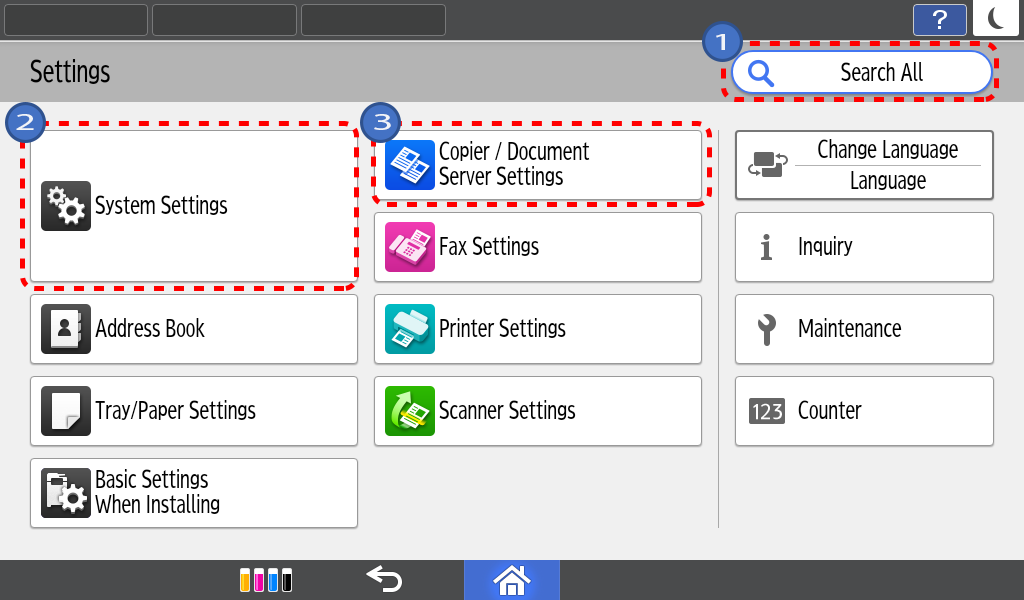
- 1 Search for any setting under Search function
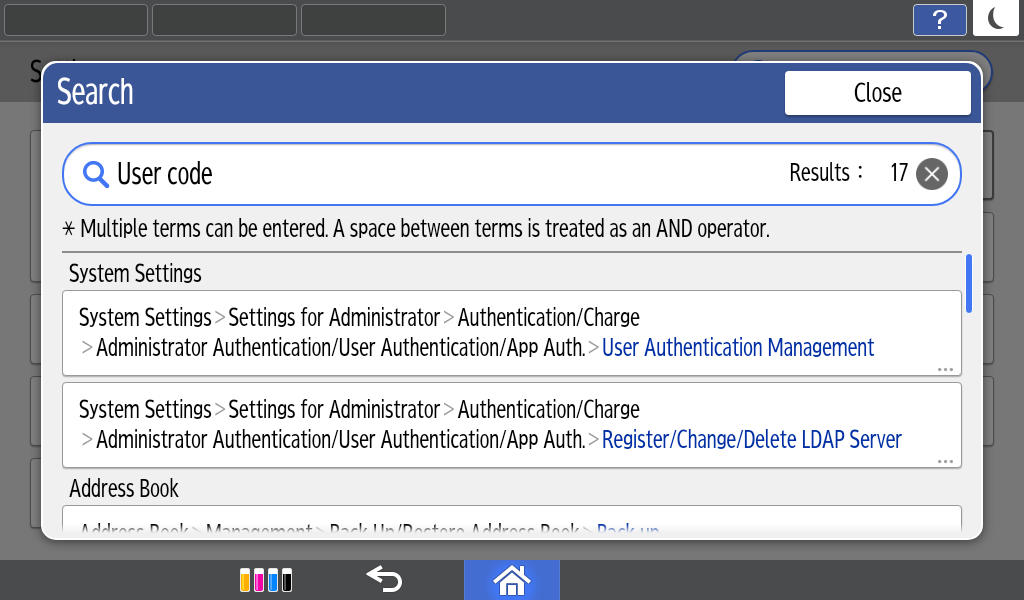
- 2 Layers are displayed on the left column for quick navigation
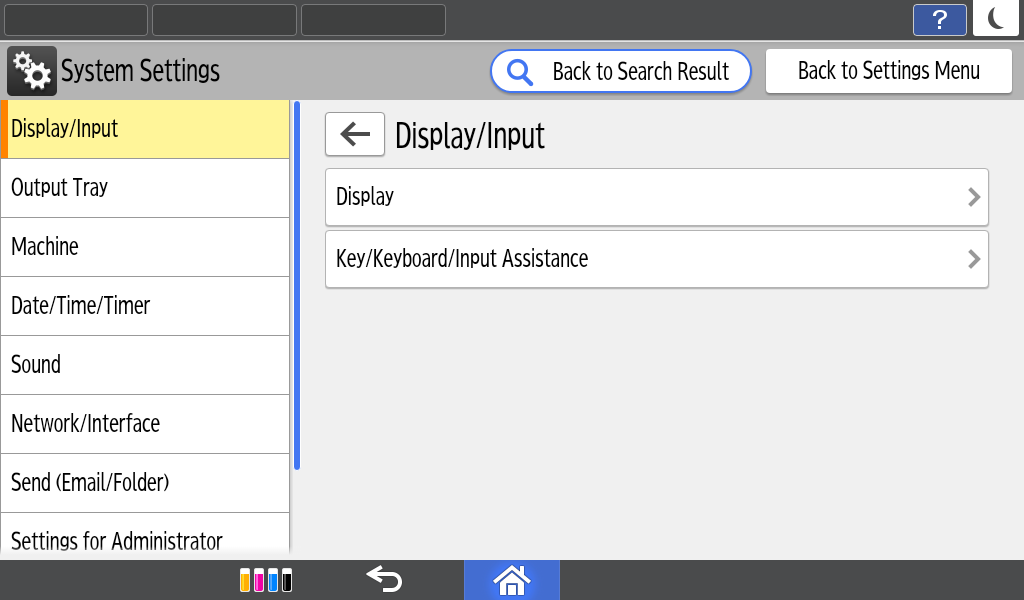
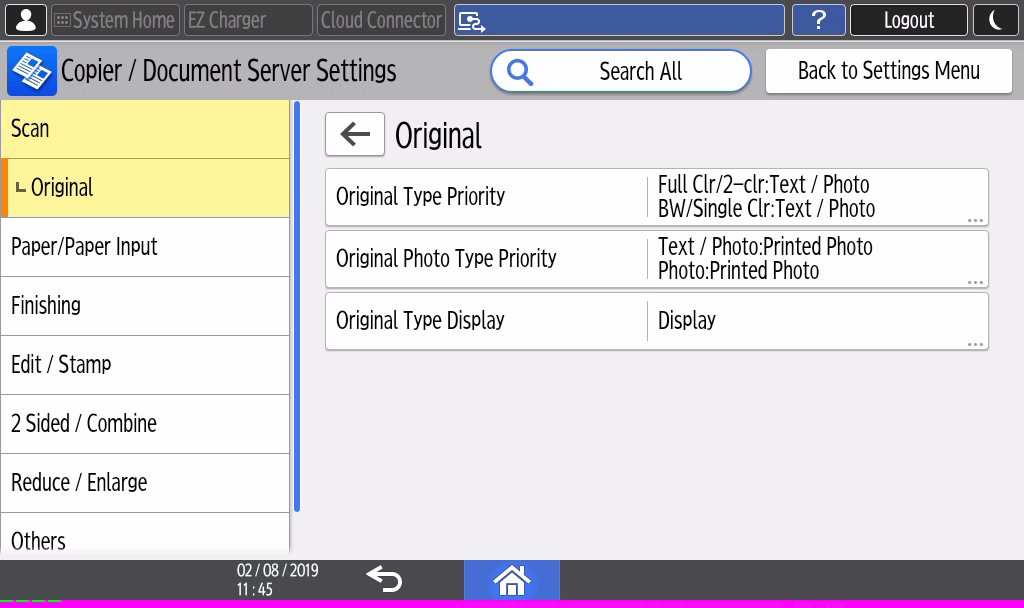
- 3 Locator key allows easy reference of user’s navigation path
Latest Copy updates
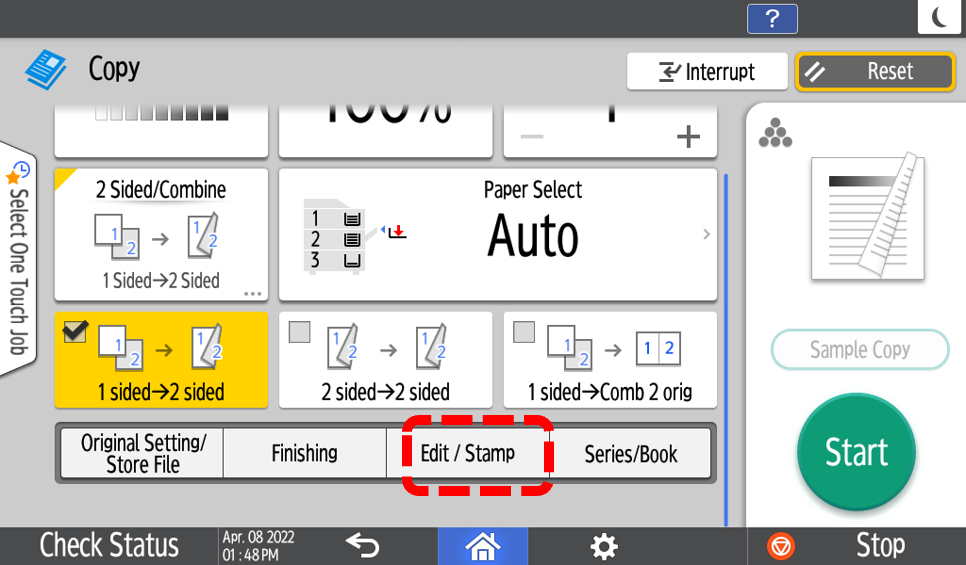
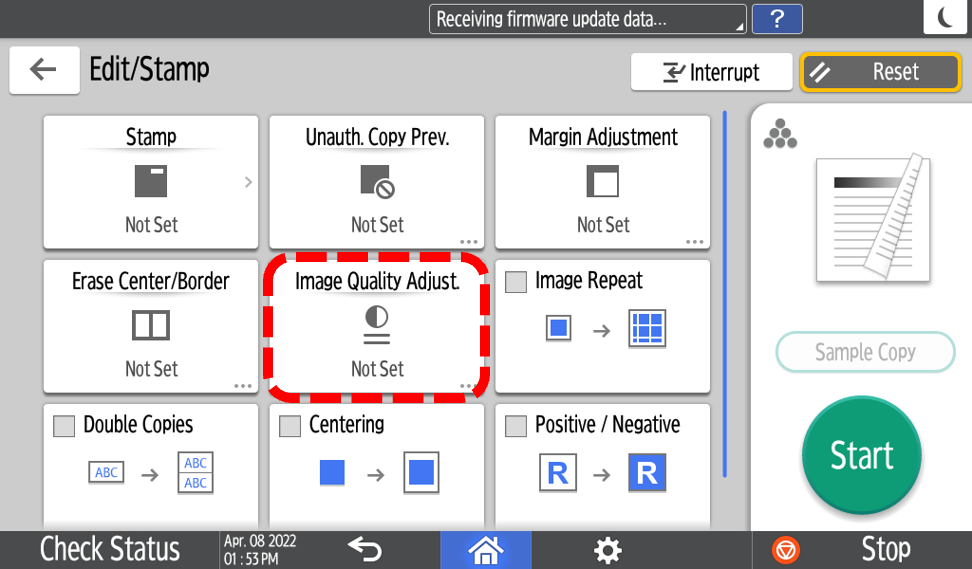
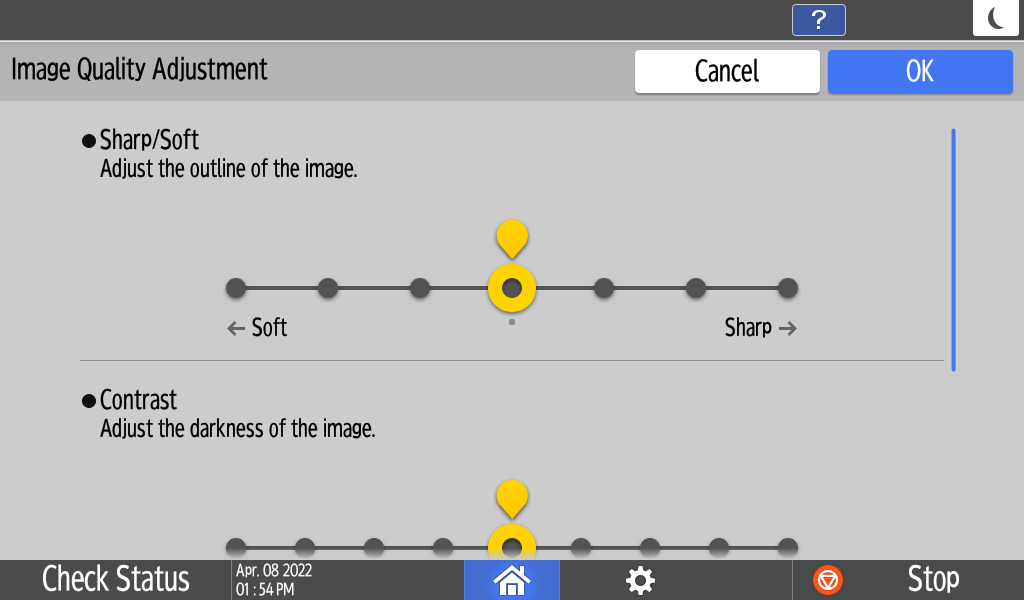
1 Copy Quality Setting
You can adjust image quality in detail.
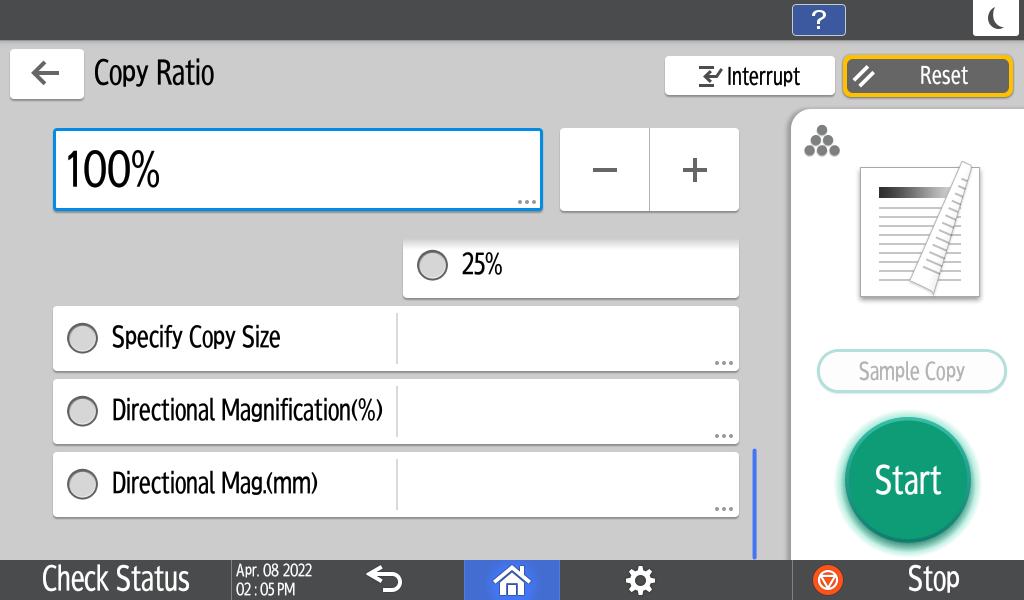
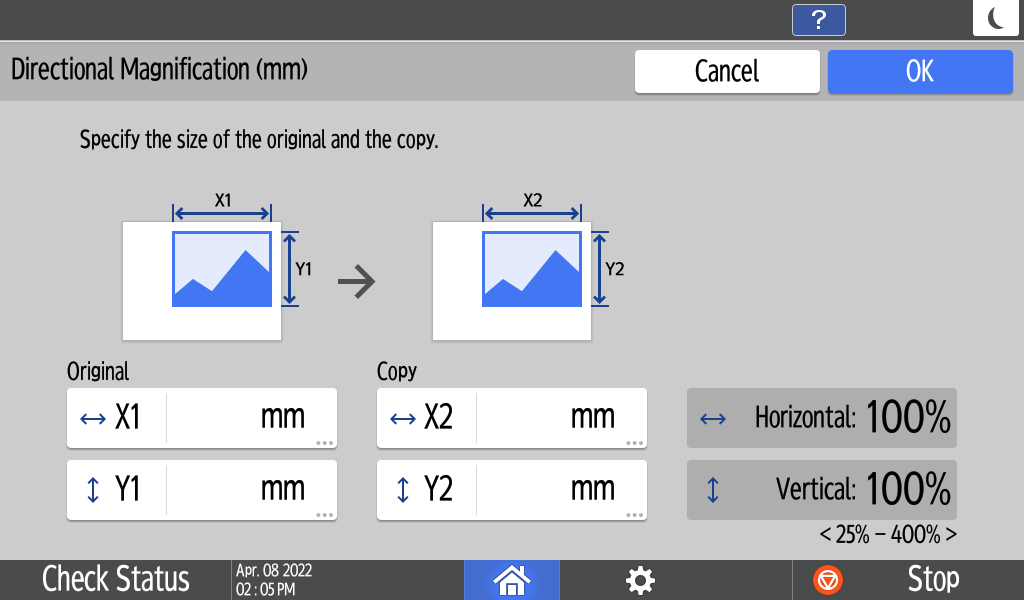
2 Directional Magnification Setting
You can adjust a magnification of copy by X and Y axis separately.
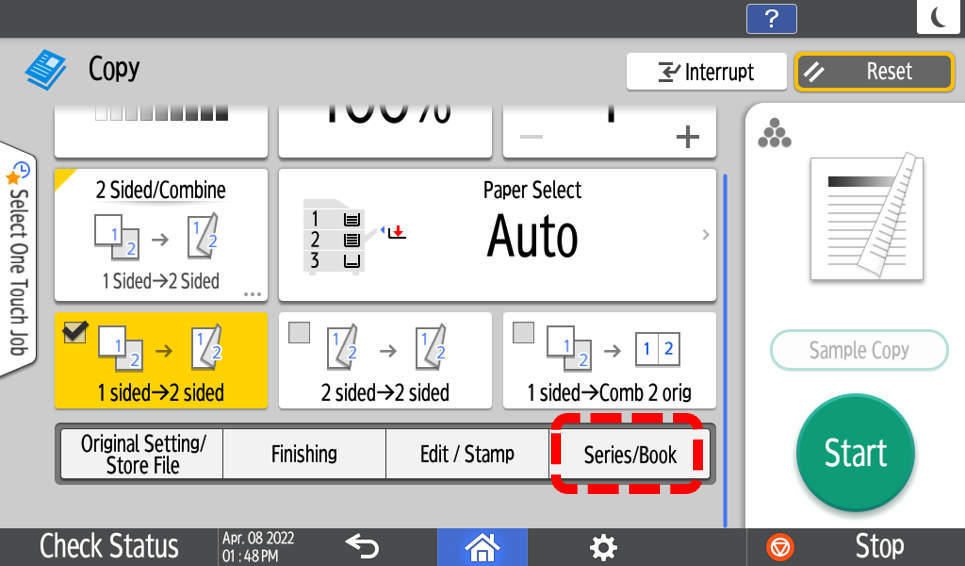
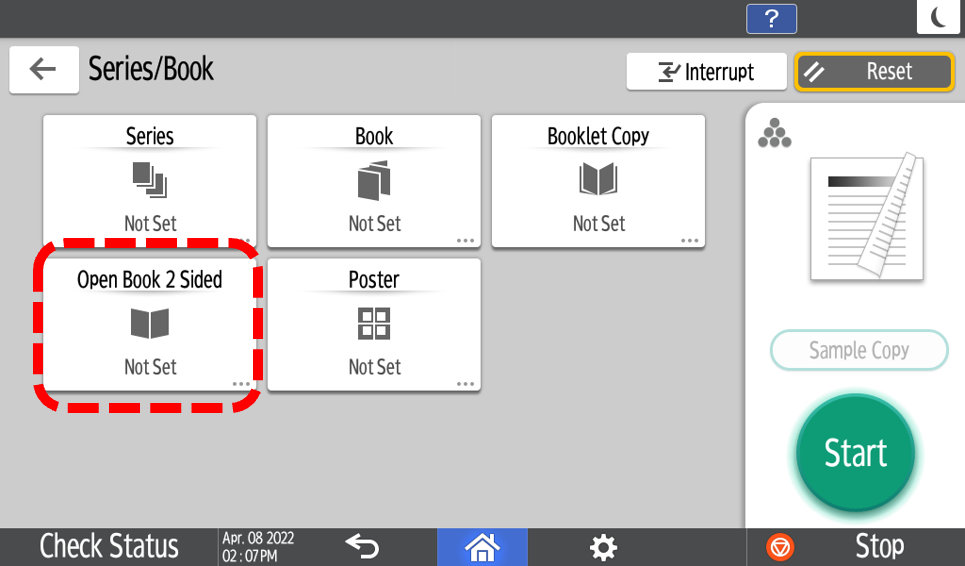
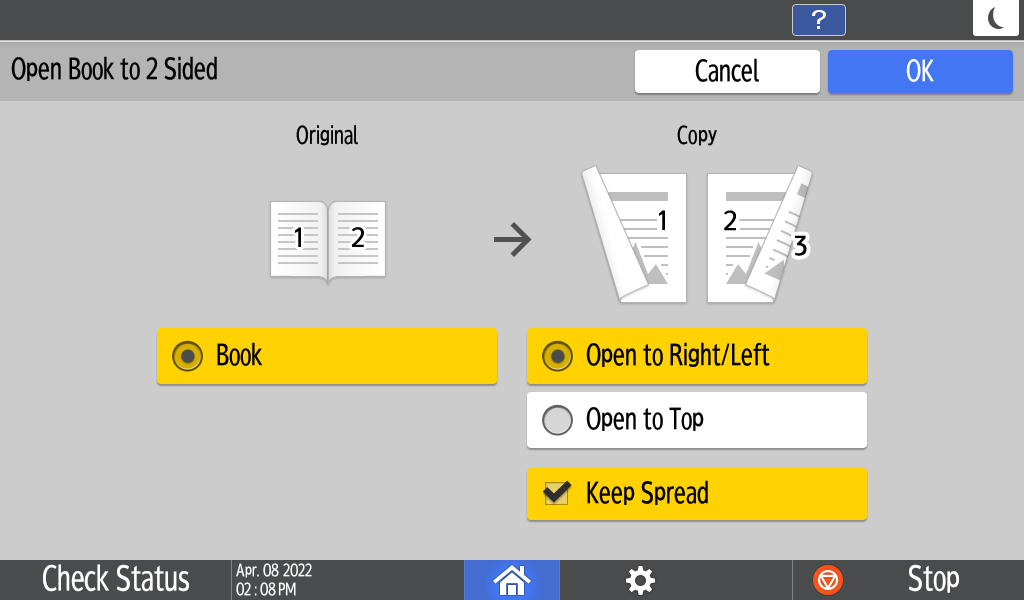
3 Spread → 2 Sided Copy Setting
You can select spread to 2 sided copy setting in detail.
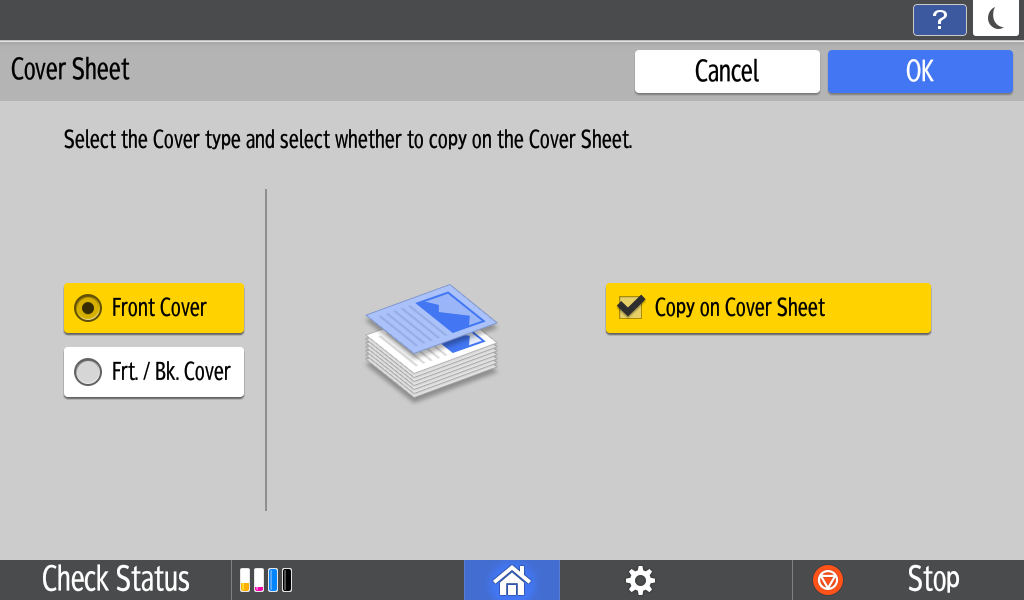
1 Insert Cover
User can insert cover paper before the first page or after the last page.
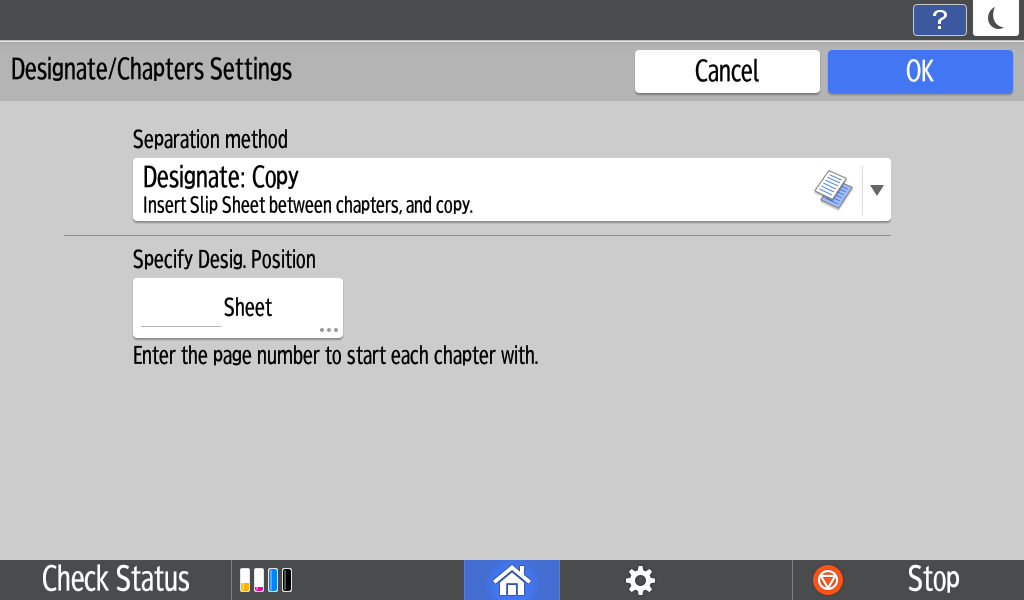
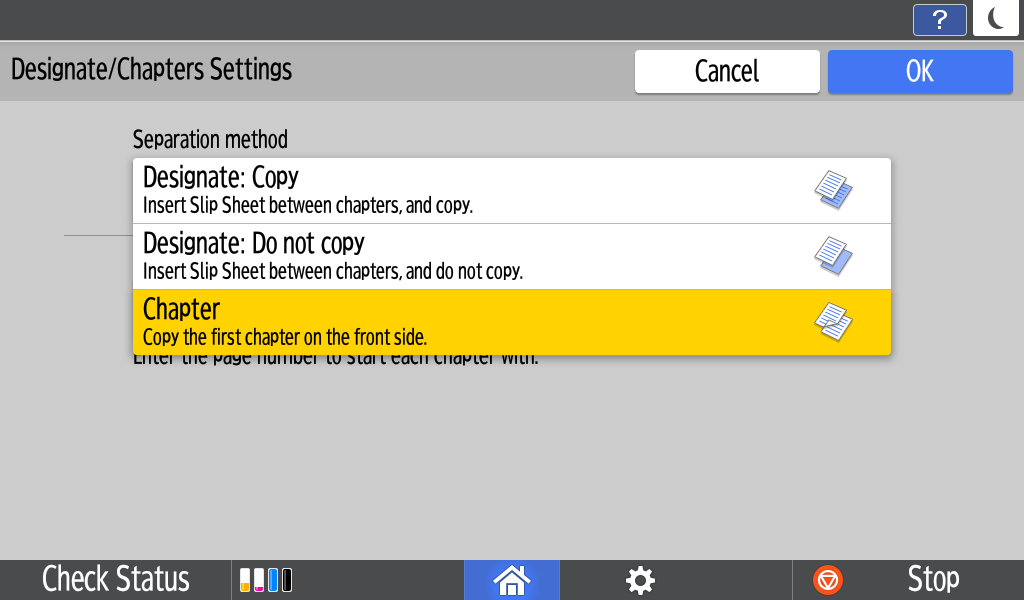
2 Insert Designate/Chapter
- Designate: Can copy the specified pages to the chapter separation paper.
- Chapter: Can always copy each specified page to the front side.
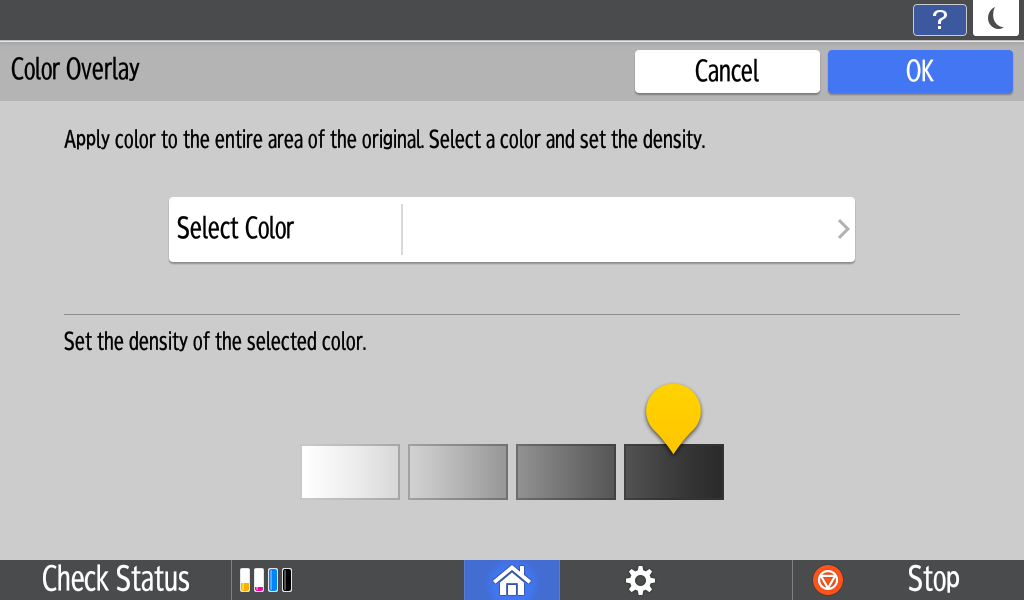
3 Colour Overlay
User can apply an overlay colour.
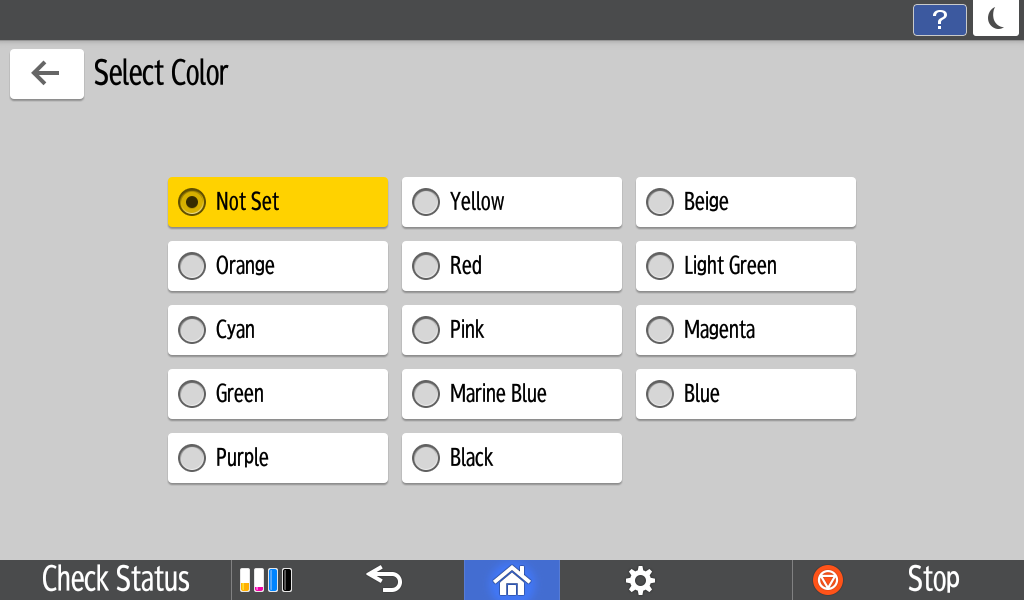
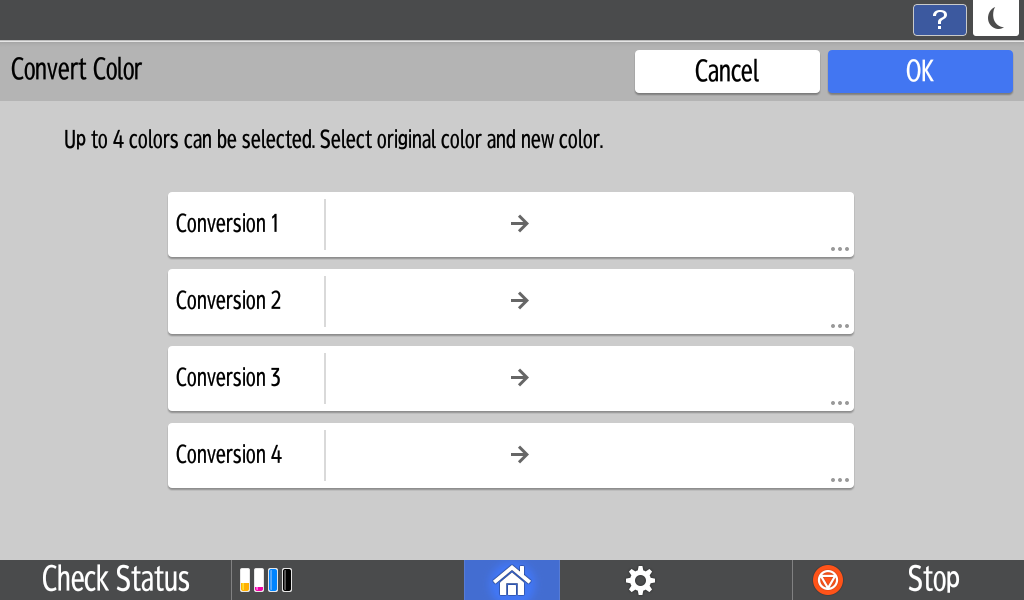
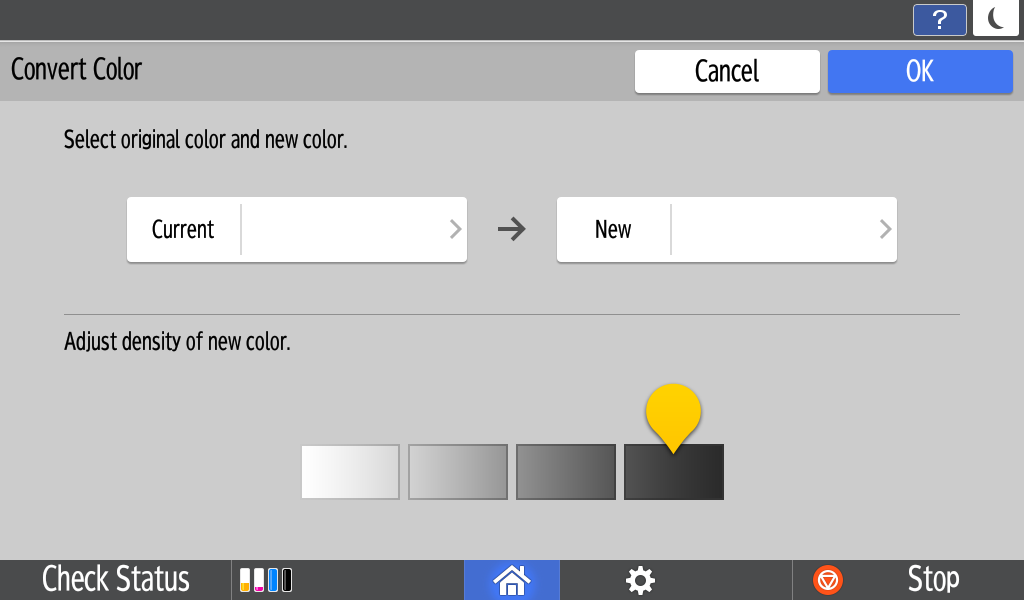
4 Convert Colour
User can select colours for conversion.
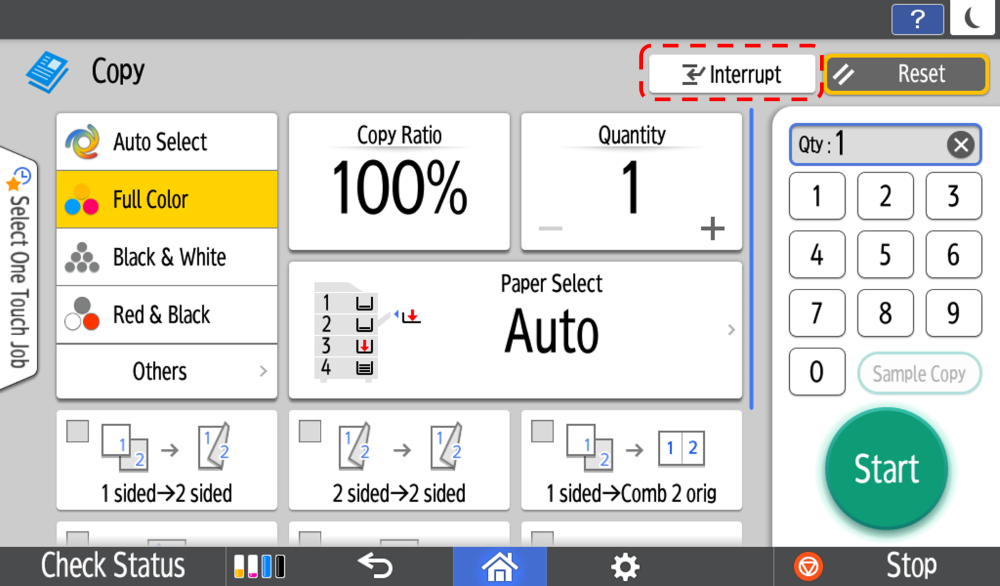
5 Interrupt Mode
An Interrupt button has been added to the Smart Copy app. The Interrupt button temporarily pauses the job in progress, allowing an urgent copy to made of another document.
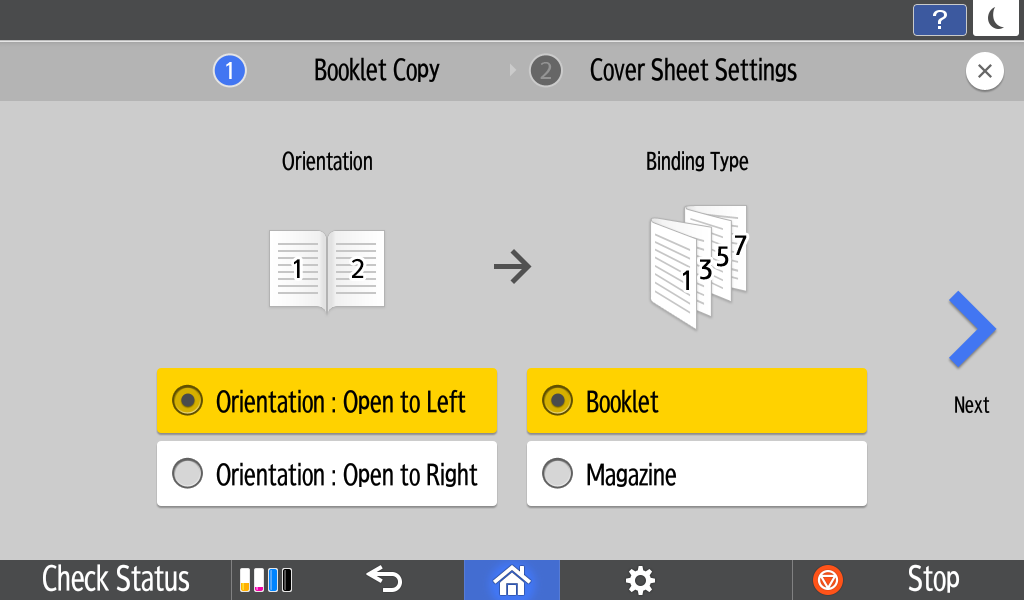
6 Booklet/Magazine Settings
A wizard is used to select the appropriate binding settings, and insert and copy onto a cover sheet, if required.
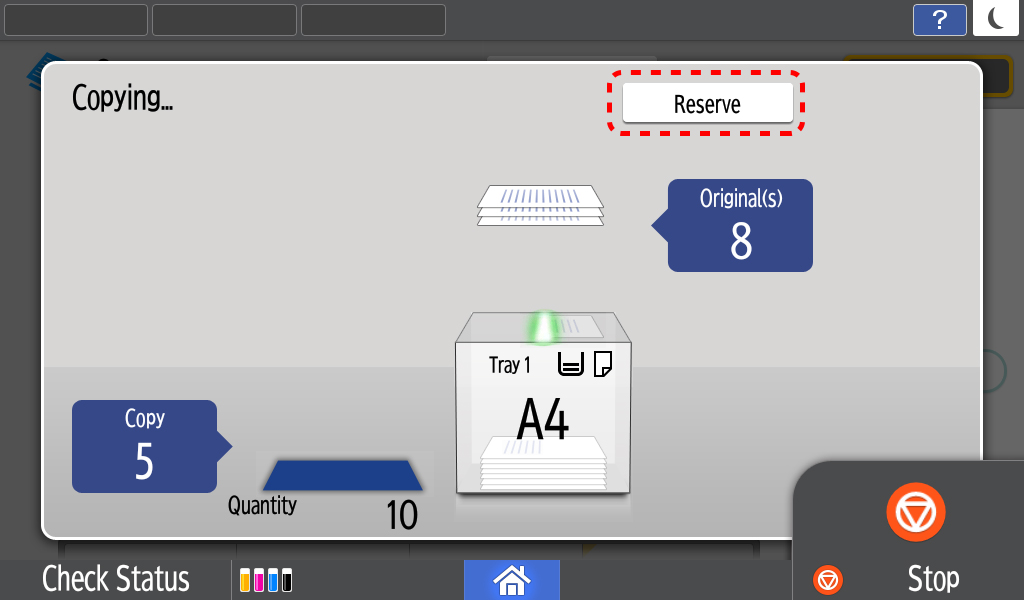
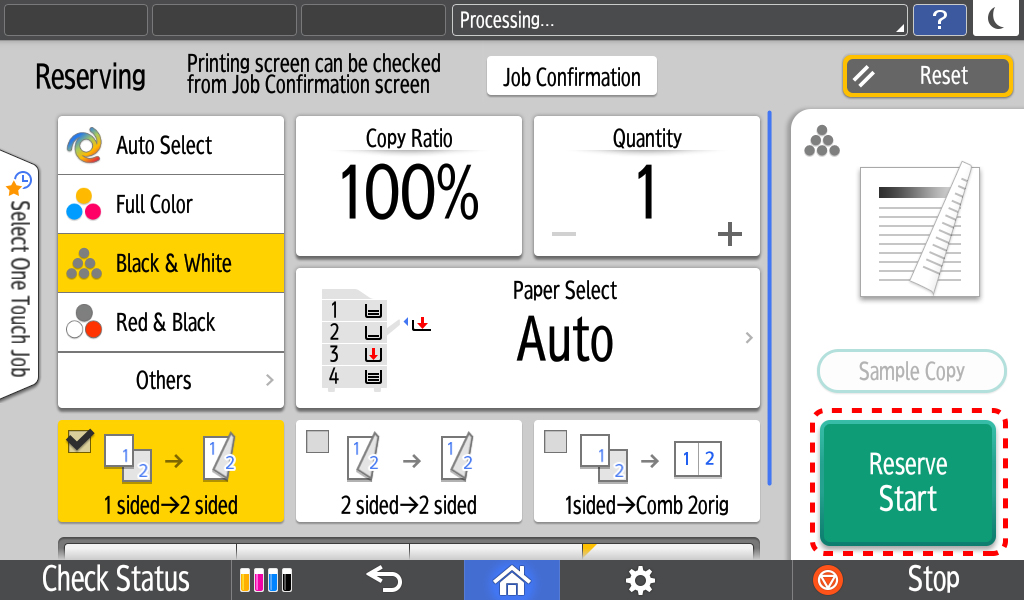
1 Reserve (Job Preset)
User can preset the next copy job during copying, and the next job will start automatically when the current job is completed.
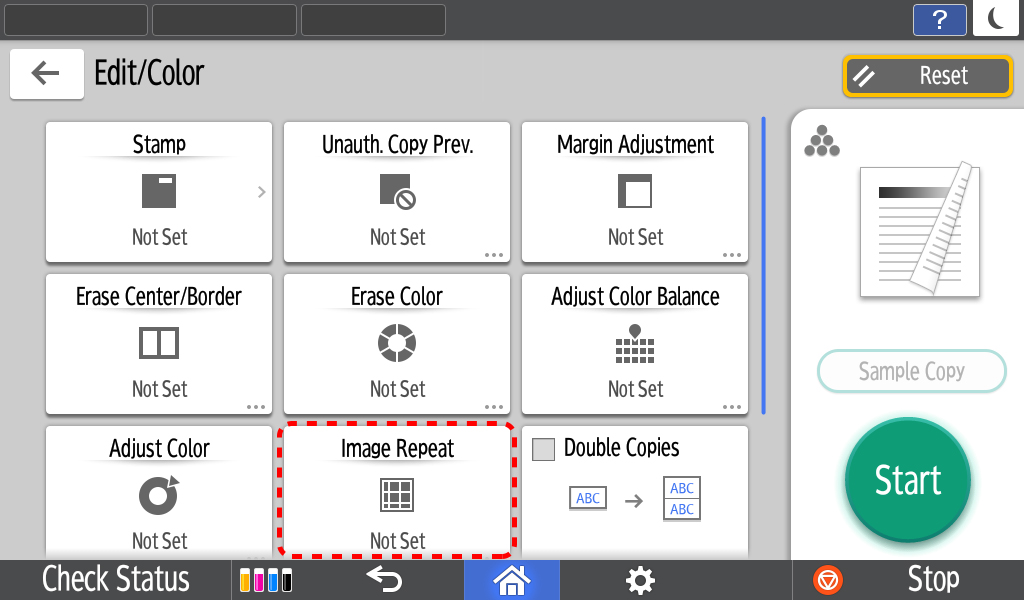
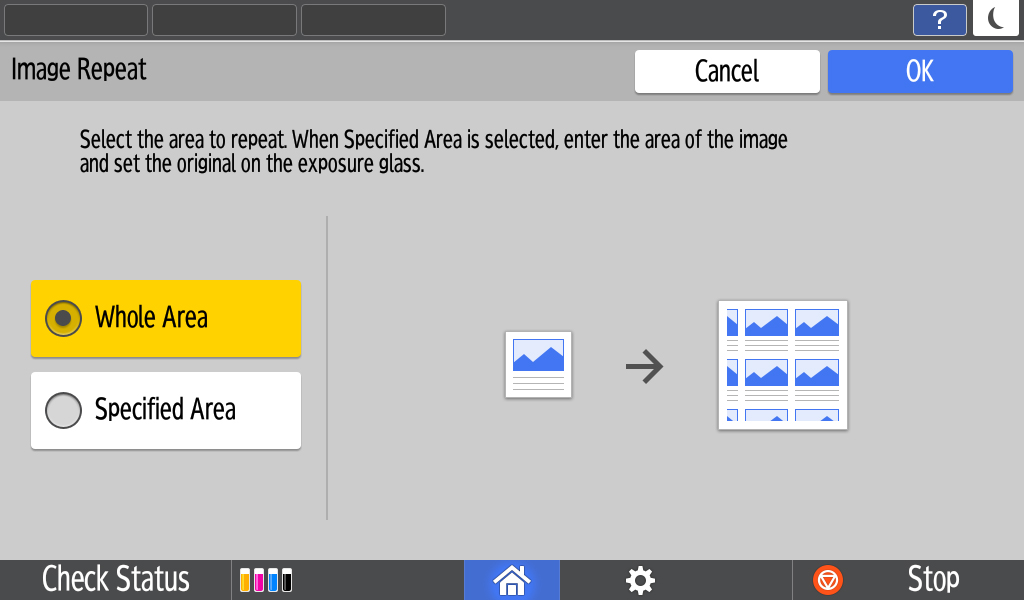
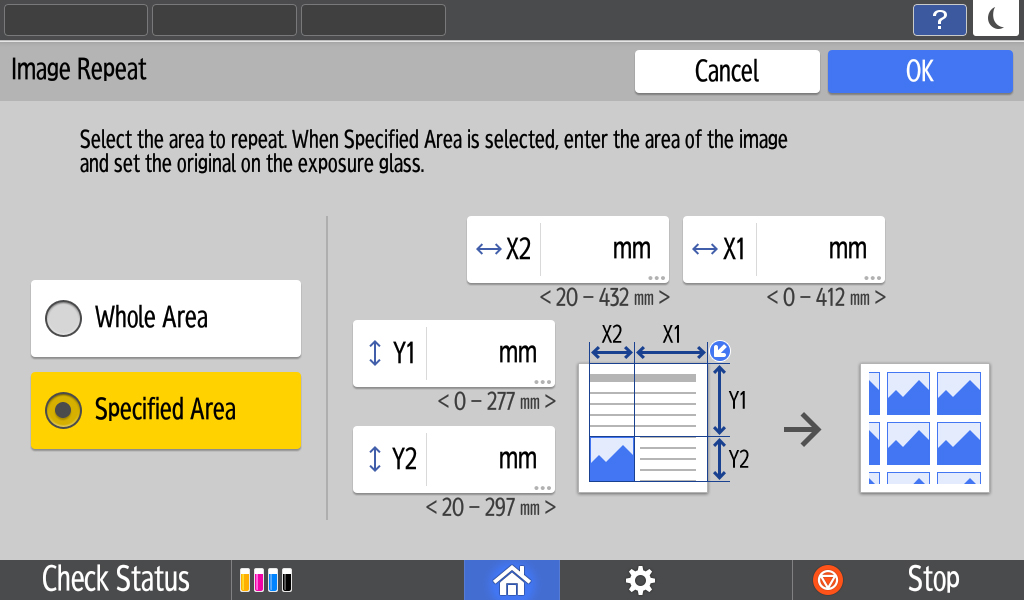
2 Repeat
The original image is copied repeatedly. The number of repeated images depends on the original size, paper size, and reproductionratio.
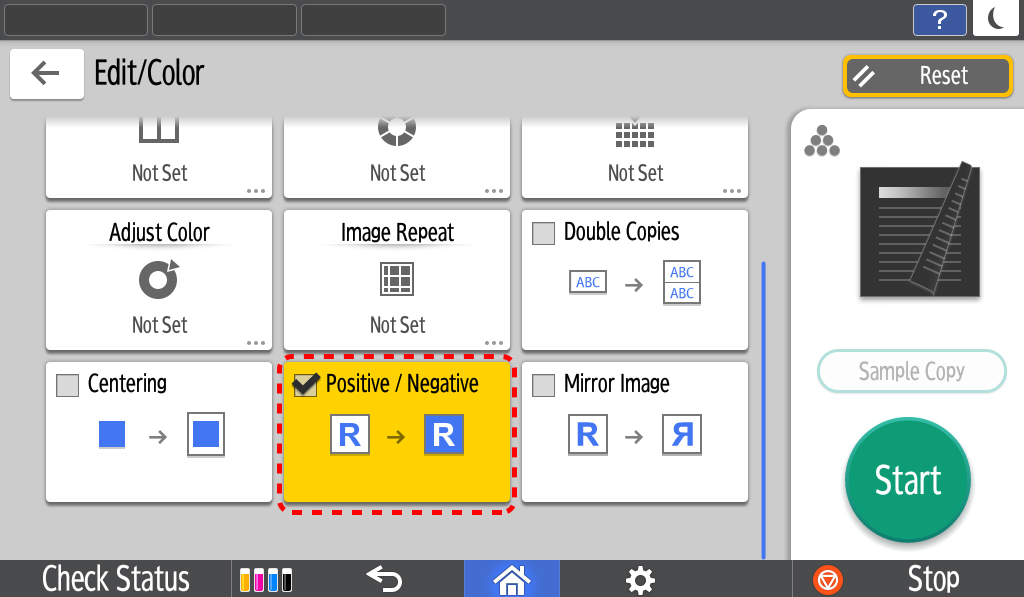
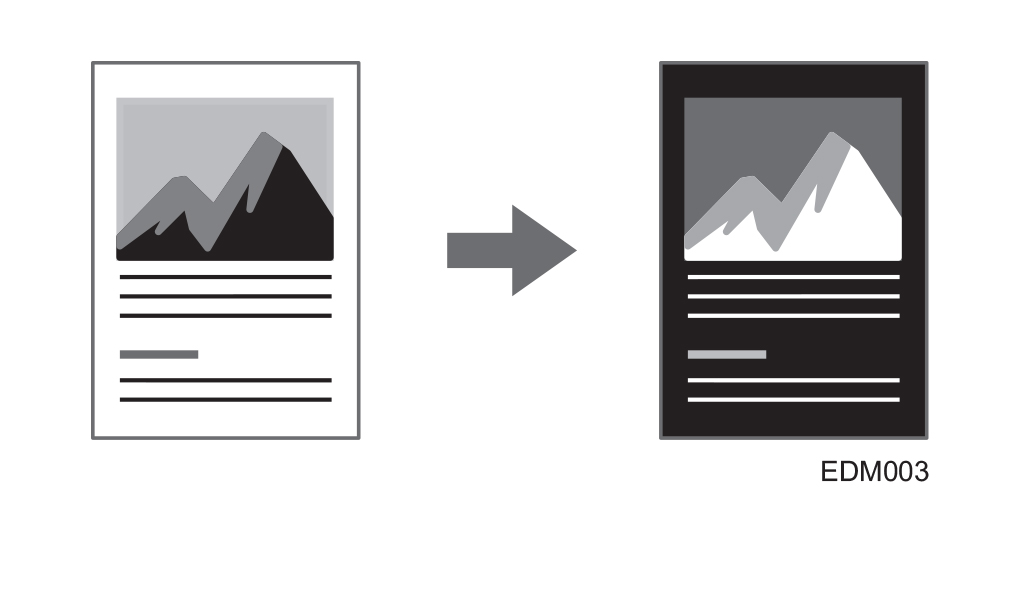
3 Positive / Negative
User can copy by inverting an image based on the original brightness when copying.
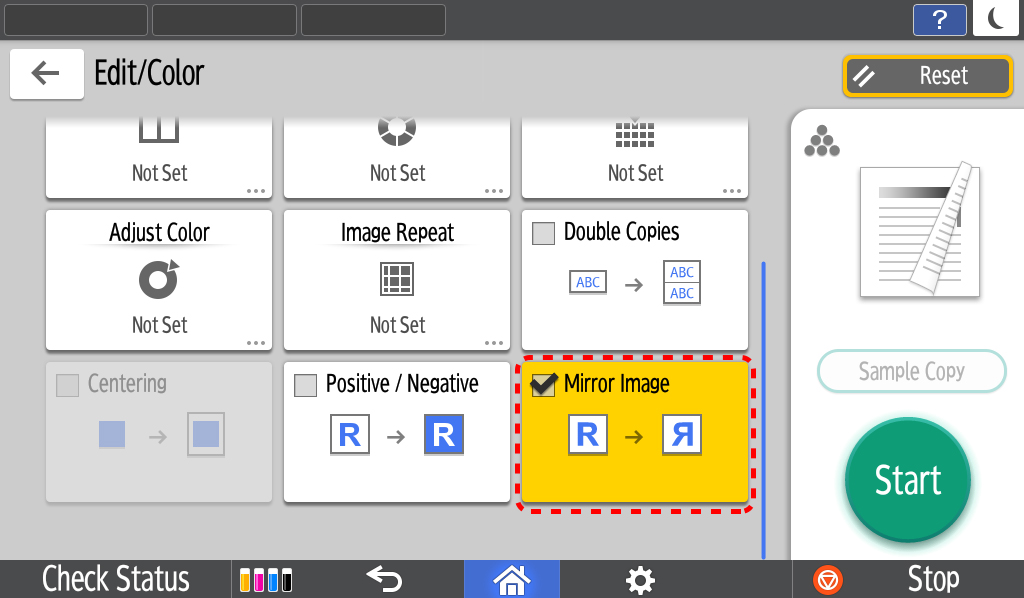
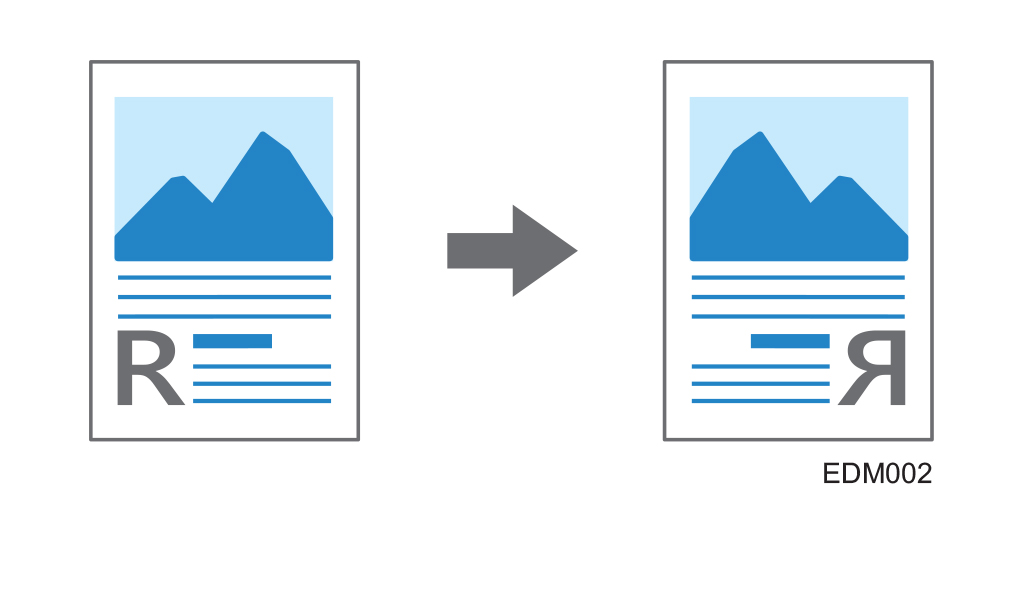
4 Mirror Image
User can copy by reversing the image from left to right, as reflected in a mirror.
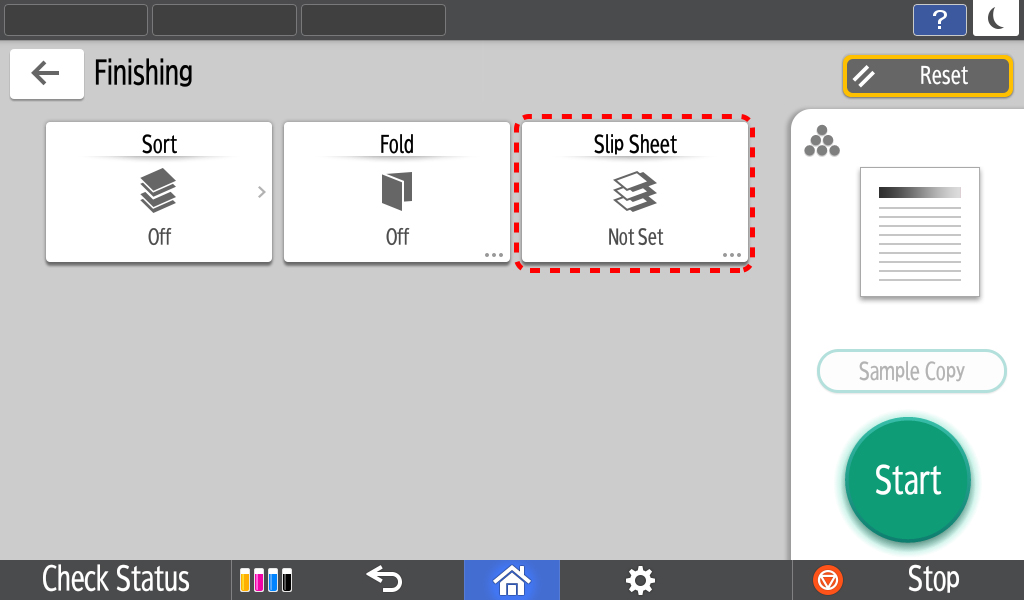
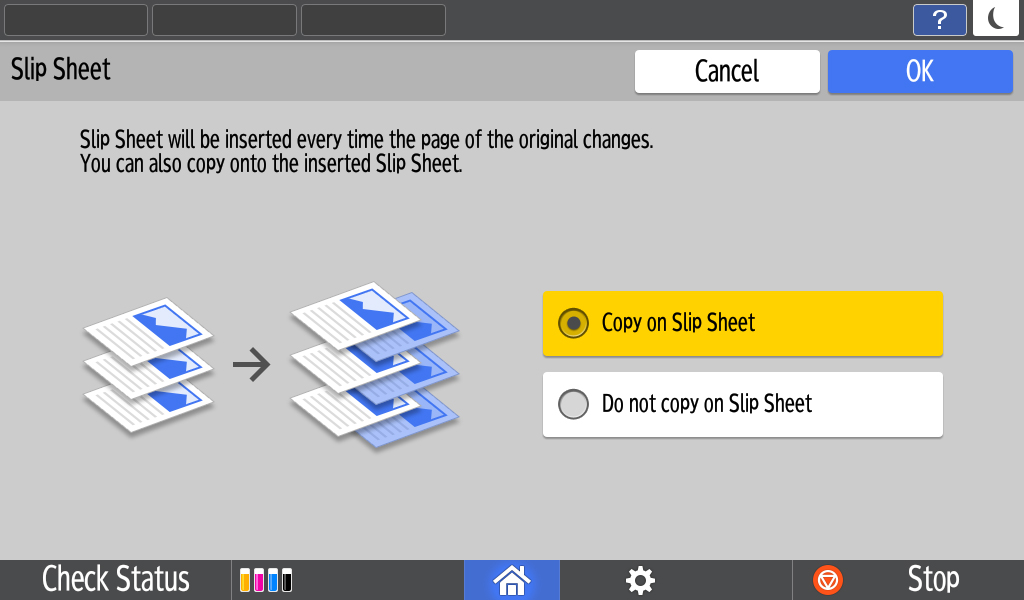
5 Slip Sheet
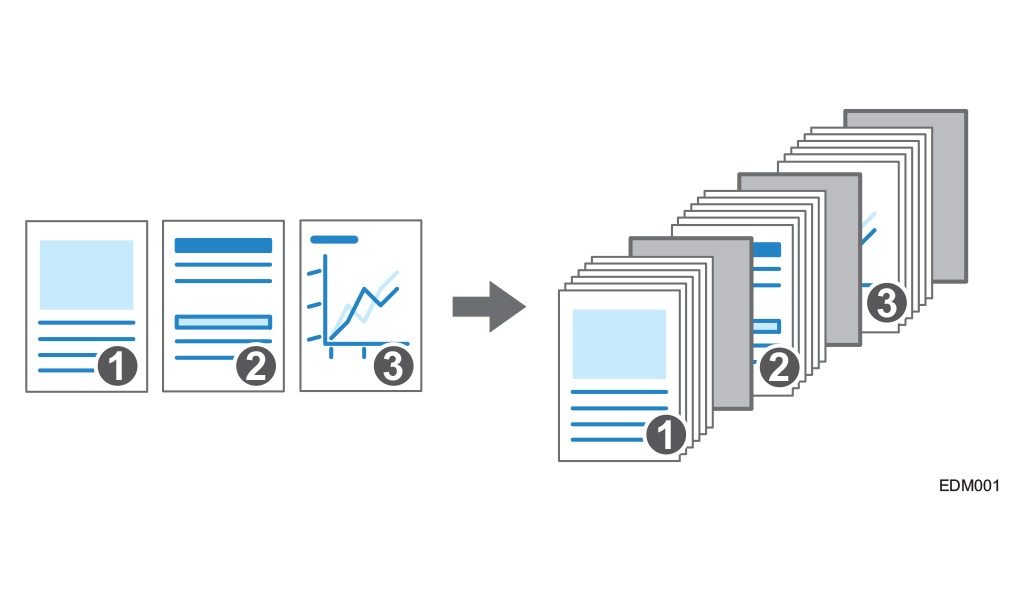
User can insert a sheet of paper at the turn of a page when copying an original comprising multiple pages at one time.
Latest Scan updates
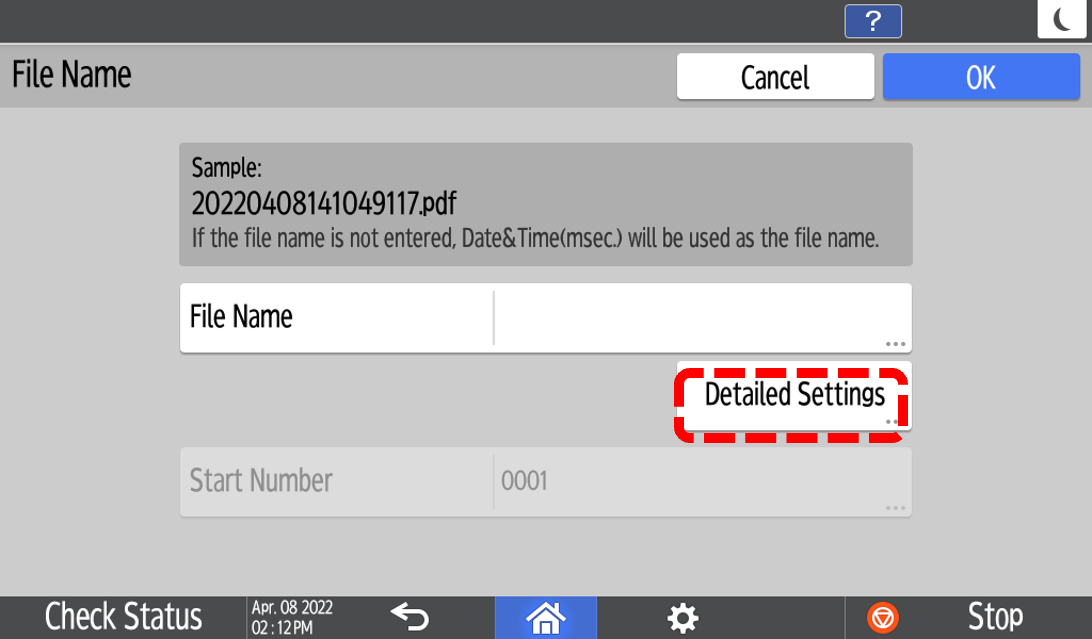
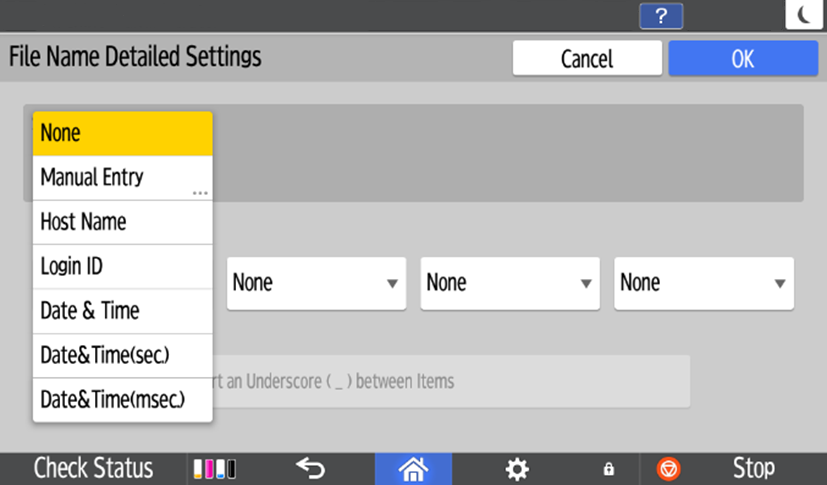
1 File name can be changed when scanning
You can set file name as rule with the combination of “Host name”, “Login ID”, “Date & Time”, and Manual Entry text.
Latest IT Feature updates
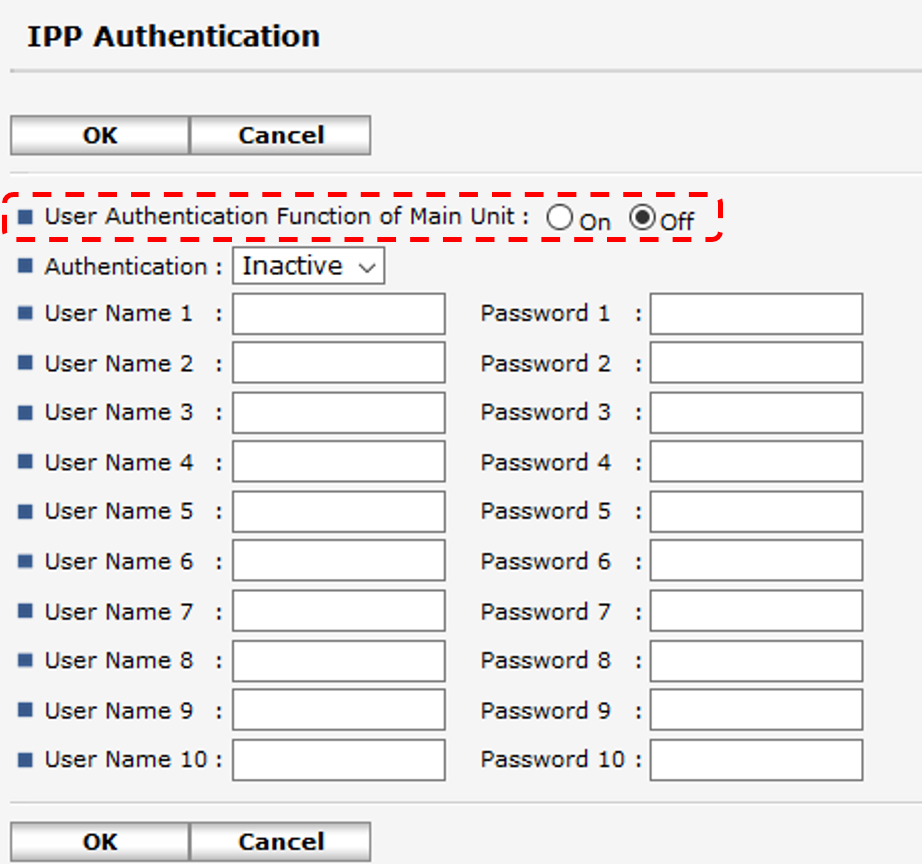
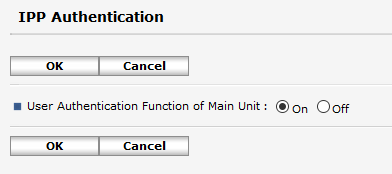
1 AirPrint user authentication/job tracking
Improving security when printing from mobile devices, user authentication is now supported for AirPrint.
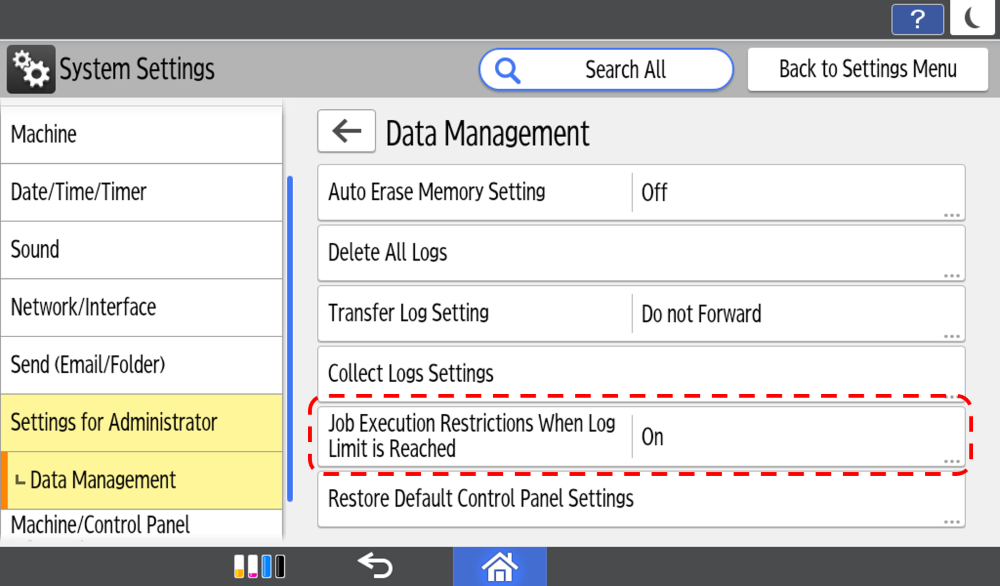
2 Data log job restrictions
To protect the integrity of the job log, it is now possible to restrict job execution when the job log is full. When this setting is enabled, the device will stop printing and alert the administrator and user when the job log is full.
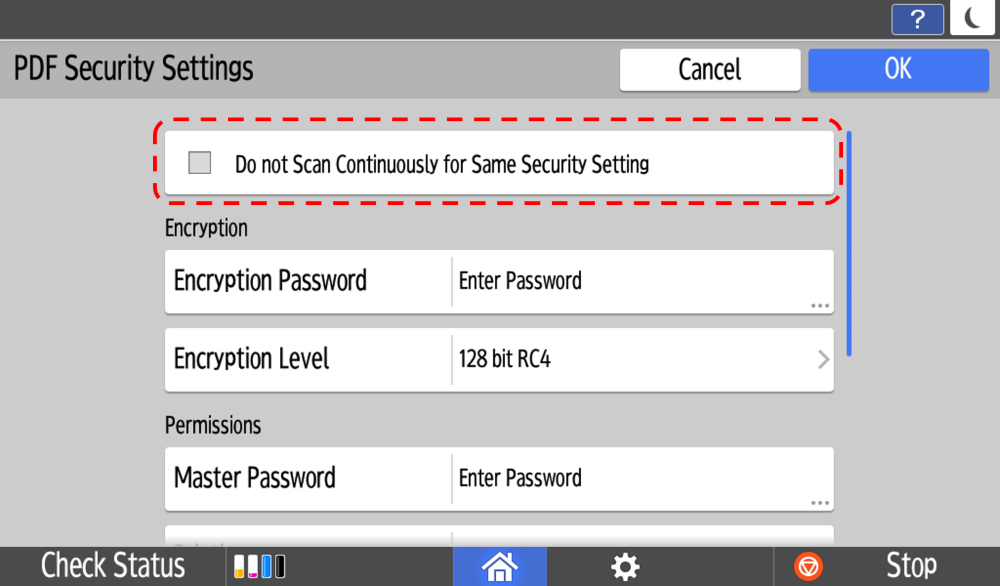
3 Reset file password after transmission
To prevent password errors and ensure that protected files can be opened, it is now possible to reset scanned file passwords after transmission.
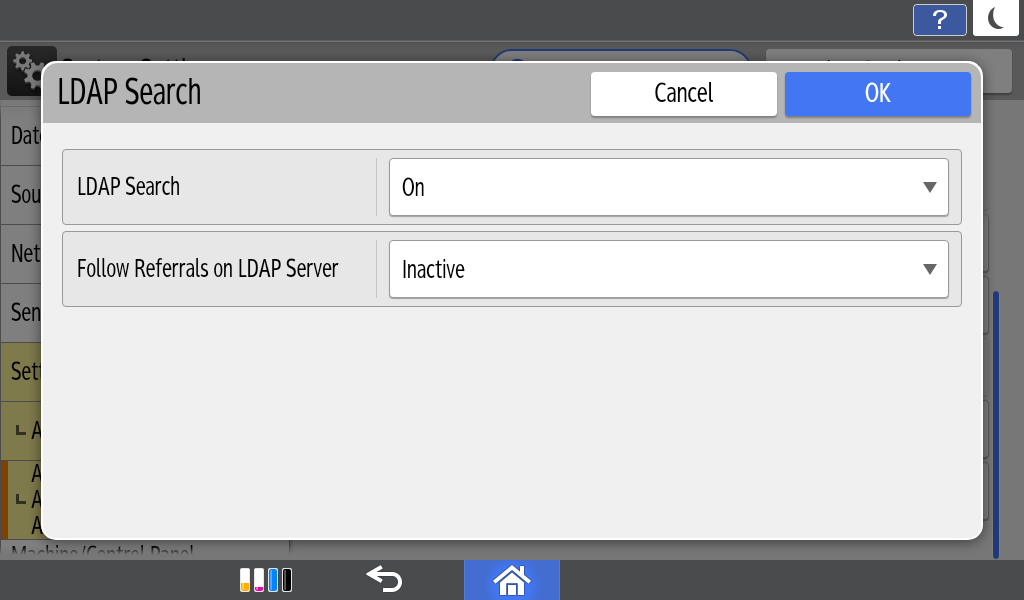
4 LDAP search improvement
To minimise LDAP search delays and associated failures, the LDAP search feature has been enhanced and now includes an additional setting intended to decrease search delays.
RICOH Always Current Technology features availability are subjected to different regions and countries.
Please contact your local representatives for more information.